

This translation is community contributed and may not be up to date. We only maintain the English version of the documentation. Read this tutorial in English
Magic Link チュートリアル
このゲームは、Bejeweled や Candy Crush の流れをくむ、定番のマッチングゲームのバリエーションです。プレイヤーは同じ色のブロックをドラッグしてつなぎ、消していきます。ただし、ゲームの目的は同じ色のブロックを長くつなげて消すことでも、盤面を空にすることでも、得点を集めることでもありません。盤面に散らばった特別な「マジックブロック」をすべてつなぐことが目的です。
このチュートリアルは、完成した設計をもとにゲームを作る手順を、段階を追って説明するガイドです。実際には、うまく機能する設計を見つけるには多くの時間と労力がかかります。核となるアイデアから始めて、それがゲームに何をもたらすかをより深く理解するために、試作品の作り方を考えることもあるでしょう。「Magic Link」のようなシンプルなゲームでも、設計にはかなりの作業が必要です。このゲームも、何度かの改良と実験を経て、最終的な(それでも完璧にはほど遠い)形とルールにたどり着きました。ただし、このチュートリアルではその過程を省き、最終的な設計をもとに制作を始めます。
はじめに
まず、新しいプロジェクトを作成し、アセットパッケージをインポートする必要があります。
- 「Empty Project」テンプレートから新しいプロジェクトを作成します。
- 参考用に、完成版の「Magic Link」プロジェクト magic-link.zip をダウンロードします。プロジェクトを一から作成したい場合に使えるよう、完成版のプロジェクトにはすべてのアセットが含まれています。
ゲームのルール

各ラウンドでは、色付きのブロックとマジックブロックが盤面にランダムに配置されます。色付きのブロックは、次のルールに従います。
- プレイヤーが同じ色のブロックをドラッグしてつなぐと、消えます。
- ブロックが消えると空きができます。色付きのブロックは、下にできた空きへまっすぐ落ちます。
- すべてのブロックは画面の下端で止まり、それ以上は落ちません。
マジックブロックの動きは異なり、次のルールに従います。
- マジックブロックは、左右どちらかに空きができると、横方向 に移動します。
- 下に空きができた場合は、代わりに通常の色付きブロックと同じように落ちます。
プレイヤーの操作には、次のルールがあります。
- プレイヤーは、上下、左右、斜めに隣接する色付きブロックをドラッグしてつなぐことができます。
- つないだブロックは、プレイヤーがタッチ入力を離すと(指を離すと)すぐに消えます。
- マジックブロックはドラッグに反応せず、手動ではつなげられません。
- ただし、マジックブロックは上下または左右につながると反応します。つまり、このように隣接すると自動で連結されます。
- プレイヤーが盤面にあるすべてのマジックブロックを自動で連結できると、そのレベルはクリアです。
難易度によって、盤面に配置されるマジックブロックの数が決まります。
概要
どのプロジェクトでもそうですが、実装をどのように進めるか、大まかな計画を立てる必要があります。ゲームの構成や作り方には、さまざまな方法があります。技術的には、必要に応じてゲーム全体を GUI システムで実装することもできます。しかし、ゲームオブジェクト(game object)とスプライト(sprite)でゲームを作り、画面上の GUI やヘッドアップディスプレイの要素には GUI API を使うのが、多くの場合、自然な作り方です。ここでもその方法を採用します。
ファイル数は比較的少なく収まる見込みなので、プロジェクトのフォルダー構造は非常にシンプルにします。

- main
- このフォルダーには、ゲームのすべてのロジックを格納します。スクリプト、ゲームオブジェクトのファイル、コレクション(collection)ファイル、GUI ファイルなどは、すべてこのフォルダーに置きます。このフォルダーをいくつかに分割したり、サブフォルダーを作成したりしてもかまいません。
- images
- すべての画像アセットをこのフォルダーに置きます。
- fonts
- テキストの描画に使うフォントをここに置きます。
- input
- 入力バインディング(input binding)をこのフォルダーに置きます。
プロジェクトの設定
game.project ファイルはほとんど既定の設定のままですが、いくつか決めておく設定があります。まず、ゲームの解像度を選ぶ必要があります。解像度は後からでも比較的簡単に変更できます。また、ゲームを完成させる際には、対象デバイスの解像度やアスペクト比にかかわらず見栄えがよくなるよう、いくらか作業が必要です。
ここでは、iPhone 4 のネイティブ解像度である 640x960 ピクセルを選びました。多くのモニターにも収まる解像度なので、コンピューターでのプレイテストもスムーズに進みます。別の解像度で作業したい場合でも、いくつかの値を調整するだけで済みます。
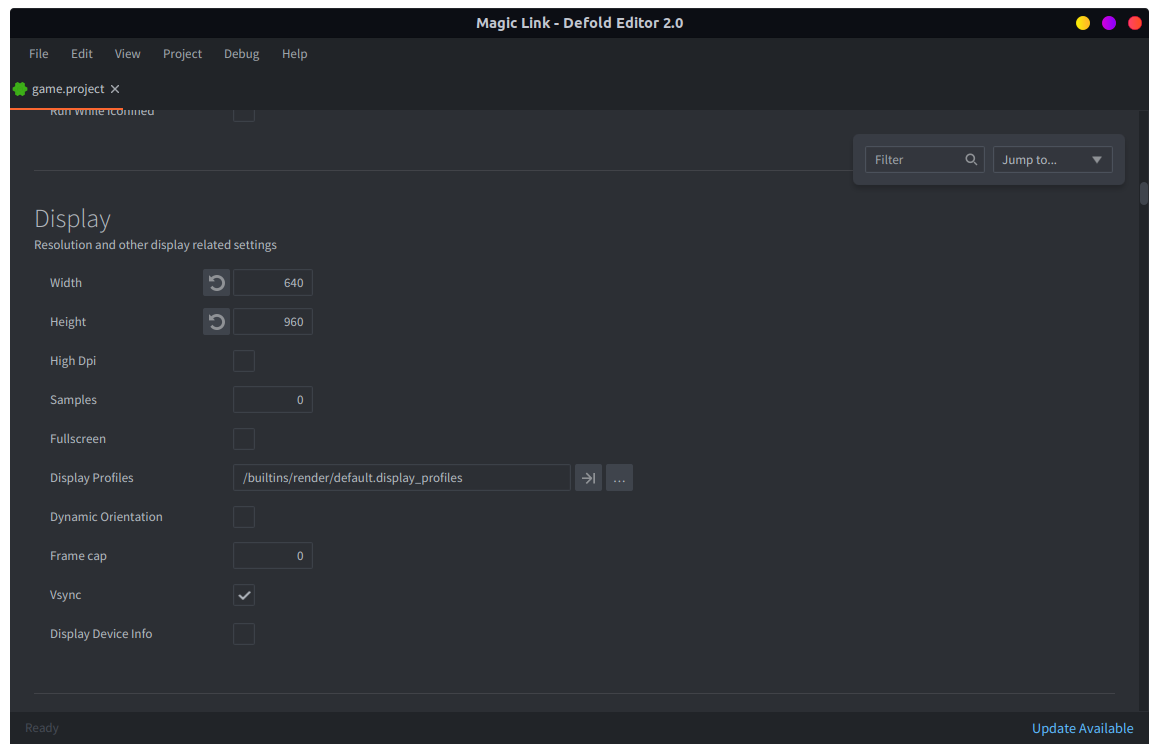
描画するスプライトの最大数も増やす必要があります。必要であれば、次のセクションに進み、スプライト数が上限に達したという通知がコンソールに表示された時点で、ここに戻ってもかまいません。

必要なスプライトの最大数を計算してみます。
- ゲームの盤面には 7x9 個のブロックを配置します。盤面の周囲には余白が必要で、上部にはいくつかの GUI 要素を置くスペースも必要です。そのため、ブロックの大きさは約 90x90 ピクセルになります。これより小さいと、小型のスマートフォンの画面では操作しにくくなります。
- ブロック1個につき、スプライトを1つ使います。1フレームのアニメーションを使って、ブロックの色を設定します。
- 一部のブロックはマジックブロックになり、それぞれの特殊効果に4つのスプライトを使います。
- 連結を示すグラフィックスには、要素1つにつきスプライトが1つ必要です。最も多い場合、プレイヤーが何らかの方法で盤面全体をつなぐと、追加で61個のスプライトが必要になります(ドラッグではつなげられない2個のマジックブロックを除きます)。
そこで、マジックブロックの最大数を30個と仮定します。盤面には63個のブロック(スプライト)があります。そのうち30個のマジックブロックには、特殊効果用のスプライトがそれぞれ4つ追加されます。これで、追加のスプライトは120個です。連結を示すグラフィックス(この場合は最大33個)を含めると、毎フレーム少なくとも 120 + 33 = 153 個のスプライトを描画する必要があります。最も近い2の累乗は256です。
ただし、最大数を256に設定するだけでは足りません。盤面を空にしてリセットするたびに、現在のゲームオブジェクトをすべて削除し、新しいものを生成します。スプライト数は、そのフレーム中に存在するすべてのオブジェクトをまかなう必要があります。削除したオブジェクトも、実際に取り除かれるのはフレームの最後なので、この数に含まれます。そのため、スプライトの最大数を512に設定すれば十分です。

グラフィックスアセットの追加
ゲームに必要なアセットは、すべてあらかじめ用意されています。512x512 ピクセルの画像として追加し、エンジンで目的のサイズに縮小します。
プロジェクト設定で hidpi を有効にすると、バックバッファーが高解像度になります。大きな画像を縮小して描画すると、Retina 画面で非常にくっきりと表示されます。

ブロックの画像に加えて、「connector」の画像とエフェクト用スプライトも含まれています。背景画像も2つあります。1つはゲーム盤面の背景、もう1つはメインメニューの背景に使います。すべての画像を images フォルダーに追加し、アトラスファイル sprites.atlas を作成します。アトラスファイルを開き、すべての画像を追加します。

ボタンやポップアップなどの GUI 要素を作るための GUI 画像も用意されています。これらは gui.atlas という別のアトラスに追加します。
盤面の生成
最初に、盤面のロジックを作ります。盤面は専用のコレクションに置き、ゲームプレイ中に画面に表示するものをすべてその中に含めます。今のところ必要なのは、「blockfactory」というファクトリー(factory)コンポーネント(component)とスクリプトだけです。後で、連結用のファクトリーとメインメニューの GUI コンポーネントを追加し、最後に、メインメニューからゲームプレイを開始するための読み込みの仕組みと、メニューに戻る方法を追加します。
mainフォルダーにboard.collectionを作成します。後でアドレスを指定できるよう、必ず「board」という名前にします。背景のスプライトコンポーネントを追加する場合は、Z 位置を -1 に設定してください。そうしないと、後で生成するすべてのブロックの背後に描画されません。- テストしやすいよう、game.project の Main Collection(Bootstrap の下)を、一時的に
/main/board.collectionに設定します。


スクリプトファイル board.script には、盤面そのものと盤面内のブロックに関するすべてのロジックを記述します。まず盤面を作る関数を作成し、init() から一時的に呼び出します。今は使いませんが、後で役立つ2つの関数も追加します。
filter()- 要素(ブロック)のリストをフィルターする関数です。
build_blocklist()- 盤面上のすべてのブロックを1つの平坦なリストにまとめ、フィルターできるようにします。
盤面を作成した後は、すべてのブロックを含む2種類のデータセット、self.blocks と self.board を使います。
-- board.script
go.property("timer", 0)     -- Use to time events
local blocksize = 80        -- Distance between block centers
local edge = 40             -- Left and right edge.
local bottom_edge = 50      -- Bottom edge.
local boardwidth = 7        -- Number of columns
local boardheight = 9       -- Number of rows
local centeroff = vmath.vector3(8, -8, 0) -- Center offset for connector gfx since there's shadow below in the block img
local dropamount = 3        -- The number of blocks dropped on a "drop"
local colors = { hash("orange"), hash("pink"), hash("blue"), hash("yellow"), hash("green") }

--
-- filter(function, table)
-- e.g: filter(is_even, {1,2,3,4}) -> {2,4}
--
local function filter(func, tbl)
    local new = {}
    for i, v in pairs(tbl) do
        if func(v) then
            new[i] = v
        end
    end
    return new
end

--
-- Build a list of blocks in 1 dimension for easy filtering
--
local function build_blocklist(self)
    self.blocks = {}
    for x, l in pairs(self.board) do
        for y, b in pairs(self.board[x]) do
            table.insert(self.blocks, { id = b.id, color = b.color, x = b.x, y = b.y })
        end
    end
end

--
-- INIT
--
function init(self)
    self.board = {}             -- Contains the board structure
    self.blocks = {}            -- List of all blocks. Used for easy filtering on selection.
    self.chain = {}             -- Current selection chain
    self.connectors = {}        -- Connector elements to mark the selection chain
    self.num_magic = 3          -- Number of magic blocks on the board
    self.drops = 1              -- Number of drops you have available
    self.magic_blocks = {}      -- Magic blocks that are lined up
    self.dragging = false       -- Drag touch input
    msg.post(".", "acquire_input_focus")
    msg.post("#", "start_level")
end

local function build_board(self)
    math.randomseed(os.time())
    local pos = vmath.vector3()
    local c
    local x = 0
    local y = 0
    for x = 0,boardwidth-1 do
        pos.x = edge + blocksize / 2 + blocksize * x
        self.board[x] = {}
        for y = 0,boardheight-1 do
            pos.y = bottom_edge + blocksize / 2 + blocksize * y
            -- Calc z
            pos.z = x * -0.1 + y * 0.01 -- <1>
            c = colors[math.random(#colors)]    -- Pick a random color
            local id = factory.create("#blockfactory", pos, null, { color = c })
            self.board[x][y] = { id = id, color = c,  x = x, y = y }
        end
    end

    -- Build 1d list that we can easily filter.
    build_blocklist(self)
end

function on_message(self, message_id, message, sender)
    if message_id == hash("start_level") then
        build_board(self)
    end
end
- ブロックの画像は重なり合うため、正しい順序で描画する必要があります。そのために、ブロックごとに z 座標を設定します。この値は、背景スプライトを置いた -1 よりも十分に大きくなります。
盤面のロジックは、「blockfactory」ファクトリーコンポーネントを通じて、「block」ゲームオブジェクトを生成します。この処理が動作するよう、ブロックのゲームオブジェクトを作成する必要があります。ブロックには、スクリプトとスプライトを持たせます。スプライトの既定のアニメーションを sprites.atlas 内の色付きブロックのいずれかに設定し、生成時にブロックが正しい色になるよう、block.script にコードを追加します。

-- block.script
go.property("color", hash("none"))

function init(self)
    go.set_scale_xy(0.18)     -- render scaled down without changing Z

    if self.color ~= nil then
        sprite.play_flipbook("#sprite", self.color)
    else
        msg.post("#sprite", "disable")
    end
end
「blockfactory」ファクトリーコンポーネントの Prototype に、新しいゲームオブジェクトのファイル block.go を設定します。

これでゲームを実行すると、ランダムな色のブロックで埋まった盤面が表示されるはずです。

操作
盤面ができたので、ユーザーの操作を追加します。まず、input フォルダーの game.input_binding に入力バインディングを定義します。game.project の設定で、この入力バインディングファイルが使われていることを確認してください。

必要なバインディングは1つだけで、アクション名「touch」に MOUSE_BUTTON_LEFT を割り当てます。このゲームではマルチタッチを使いません。Defold には、1本指でのタッチ入力をマウスの左クリックに変換する便利な仕組みがあります。
入力の処理は盤面が担当するため、board.script にそのコードを追加する必要があります。
-- board.script
function on_input(self, action_id, action)
    if action_id == hash("touch") and action.value == 1 then
        -- What block was touched or dragged over?
        local x = math.floor((action.x - edge) / blocksize)
        local y = math.floor((action.y - bottom_edge) / blocksize)

        if x < 0 or x >= boardwidth or y < 0 or y >= boardheight or self.board[x][y] == nil then
            -- outside board.
            return
        end

        if action.pressed then
            -- Player started touch
            msg.post(self.board[x][y].id, "make_orange")

            self.dragging = true
        elseif self.dragging then
            -- then drag
            msg.post(self.board[x][y].id, "make_green")
        end
    elseif action_id == hash("touch") and action.released then
        -- Player released touch.
        self.dragging = false
    end
end
make_orange と make_green は、コードが動いていることを目で確認するための一時的なメッセージです。これらのメッセージを処理するコードを、block.script に追加する必要があります。
-- block.script
function on_message(self, message_id, message, sender)
    if message_id == hash("make_orange") then
        sprite.play_flipbook("#sprite", hash("orange"))
    elseif message_id == hash("make_green") then
        sprite.play_flipbook("#sprite", hash("green"))
    end
end
これで、タッチしている間(またはマウスボタンを押している間)、ブロックには最初に make_orange メッセージが1回送られ、続いて make_green メッセージが繰り返し送られます。そのため、ブロックは緑色になる前に一瞬だけオレンジ色にちらつく程度か、オレンジ色が見えないこともあります。それでも、プレイヤーがどのブロックに触れているかは分かります。入力の処理をさらに詳しく追いたい場合は、コードに print() や pprint() の呼び出しを追加してください。
連結の表示
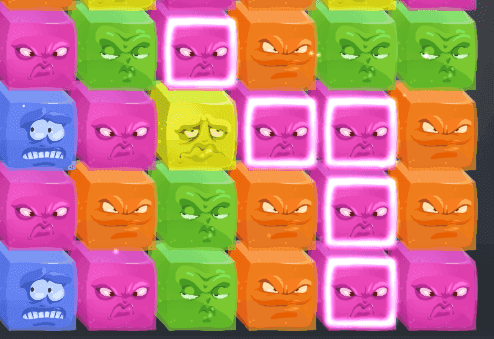
次に、プレイヤーがブロックをつないだことを示すマーカー用のアセットが必要です。各ブロックの上にグラフィックスを重ねるだけで、連結されていることを示します。
コネクターのスプライト画像を持つ「connector」ゲームオブジェクトと、「board」ゲームオブジェクト内の「connector factory」ファクトリーコンポーネントを作成する必要があります。


このゲームオブジェクトのスクリプトは最小限で済みます。グラフィックスのスケールをゲームのほかの部分に合わせ、Z の描画順序を正しく設定するだけです。
-- connector.script
function init(self)
    go.set_scale_xy(0.18)           -- Scale in 2D without changing Z.
    go.set(".", "position.z", 1)    -- Put on top.
end
same_color_neighbors() 関数は、特定のブロック(位置 x, y)に隣接する、同じ色のブロックのリストを返します。この関数では、self.blocks に格納された全ブロックの平坦なリストに filter() 関数を適用します。
-- board.script
--
-- Returns a list of neighbor blocks of the same color as the
-- block on x, y
--
local function same_color_neighbors(self, x, y)
    local f = function (v)
        return (v.id ~= self.board[x][y].id) and
               (v.x == x or v.x == x - 1 or v.x == x + 1) and
               (v.y == y or v.y == y - 1 or v.y == y + 1) and
               (v.color == self.board[x][y].color)
    end
    return filter(f, self.blocks)
end
補助関数 in_blocklist() は、ブロックがブロックのリスト内に存在するかどうかを確認します。
-- board.script
--
-- Does the block exist in the list of blocks?
--
local function in_blocklist(blocks, block)
    for i, b in pairs(blocks) do
        if b.id == block then
            return true
        end
    end
    return false
end
on_input() でタッチやドラッグの入力を処理する際に、これらの関数を使って、触れたブロックの連結を組み立てます。マジックブロックはまだありませんが、ここで判定して無視するようにしておきます。
-- board.script
function on_input(self, action_id, action)

    ...

    -- If trying to manipulate magic blocks, ignore.
    if self.board[x][y].color == hash("magic") then
        return
    end

    if action.pressed then
        -- List of neighbors of the same color as touched block
        self.neighbors = same_color_neighbors(self, x, y)
        self.chain = {}
        table.insert(self.chain, self.board[x][y])

        -- Mark block.
        p = go.get_position(self.board[x][y].id)
        local id = factory.create("#connectorfactory", p + centeroff)
        table.insert(self.connectors, id)

        self.dragging = true
    elseif self.dragging then
        -- then drag
        if in_blocklist(self.neighbors, self.board[x][y].id) and not in_blocklist(self.chain, self.board[x][y].id) then
            -- dragging over a same-colored neighbor
            table.insert(self.chain, self.board[x][y])
            self.neighbors = same_color_neighbors(self, x, y)

            -- Mark block.
            p = go.get_position(self.board[x][y].id)
            local id = factory.create("#connectorfactory", p + centeroff)
            table.insert(self.connectors, id)
        end
    end
最後に、タッチを離したら、連結を示すすべてのコネクターを画面から削除します。
-- board.script
function on_input(self, action_id, action)

    ...

    elseif action_id == hash("touch") and action.released then
        -- Player released touch.
        self.dragging = false

        -- Empty chain of connector graphics.
        for i, c in ipairs(self.connectors) do
            go.delete(c)
        end
        self.connectors = {}
    end
end
連結したブロックの削除
同じ色のブロックをつなぐロジックができたので、連結したブロックを消すだけなら簡単です。盤面の位置を単に nil にせず、hash("removing") に設定しているのには理由があります。後でマジックブロックのロジックを作るときに、マジックブロックが移動できるのを、直前に削除されたブロックの位置だけに限定する必要があるためです。ここで盤面の位置を nil にすると、直前に削除されたブロックと、以前に削除されたブロックを区別できなくなります。
-- board.script
-- Remove the currently selected block-chain
--
local function remove_chain(self)
    -- Delete all chained blocks
    for i, c in ipairs(self.chain) do
        self.board[c.x][c.y] = hash("removing")
        go.delete(c.id)
    end
    self.chain = {}
end
hash("removing") に設定された盤面の位置を、実際に削除する(nil にする)関数も必要です。
-- board.script
--
-- Set removed blocks to nil
--
local function nilremoved(self)
    for y = 0,boardheight - 1 do
        for x = 0,boardwidth - 1 do
            if self.board[x][y] == hash("removing") then
                self.board[x][y] = nil
            end
        end
    end
end
下のブロックが削除される(nil になる)と、残ったブロックを下に移動させる関数も作成します。盤面を左から右へ列ごとに調べ、各列を下から上へ走査します。空の位置(nil)が見つかったら、その上にあるすべてのブロックを下に移動させます。
-- board.script
--
-- Apply shift-down logic to all blocks.
--
local function slide_board(self)
    -- Slide all remaining blocks down into blank spots.
    -- Going column by column makes this easy.
    local dy = 0
    local pos = vmath.vector3()
    for x = 0,boardwidth - 1 do
        dy = 0
        for y = 0,boardheight - 1 do
            if self.board[x][y] ~= nil then
                if dy > 0 then
                    -- Move down dy steps
                    self.board[x][y - dy] = self.board[x][y]
                    self.board[x][y] = nil
                    -- Calc new position
                    self.board[x][y - dy].y = self.board[x][y - dy].y - dy
                    go.animate(self.board[x][y-dy].id, "position.y", go.PLAYBACK_ONCE_FORWARD, bottom_edge + blocksize / 2 + blocksize * (y - dy), go.EASING_OUTBOUNCE, 0.3)
                    -- Calc new z
                    go.set(self.board[x][y-dy].id, "position.z", x * -0.1 + (y-dy) * 0.01)
                end
            else
                dy = dy + 1
            end
        end
    end
    -- blocklist needs updating
    build_blocklist(self)
end

あとは、タッチが離され、self.chain にブロックが入っているときに、on_input() でこれらの関数を呼び出すだけです。
-- board.script
function on_input(self, action_id, action)

    ...

    elseif action_id == hash("touch") and action.released then
        -- Player released touch.
        self.dragging = false

        if #self.chain > 1 then
            -- There is a chain of blocks. Remove it from board and slide the remaining blocks down.
            remove_chain(self)
            nilremoved(self)
            slide_board(self)
        end

        -- Empty chain of connector graphics.
        for i, c in ipairs(self.connectors) do
            go.delete(c)
        end
        self.connectors = {}
    end
マジックブロックのロジック
いよいよマジックブロックを追加します。まず、通常のブロックをマジックブロックに変える機能を追加します。これにより、盤面を埋めた後に別の処理を行い、必要なブロックをマジックブロックに変換できます。マジックブロックの見た目を少し華やかにするため、最初にアニメーションする魔法のエフェクトを作成します。マジックブロックから生成できるゲームオブジェクト magic_fx.go として作ります。

このゲームオブジェクトには、2つのスプライトが含まれます。1つは「magic」の色(画像 magic-sphere_layer2.png を使うスプライト)、もう1つは「light」のエフェクト(画像 magic-sphere_layer3.png を使うスプライト)です。オブジェクトは、生成されると direction プロパティの値に応じて回転するように設定します。また、光のエフェクト用スプライトを制御する2つのメッセージ、lights_on と lights_off を受信できるようにします。
新しいスクリプトを作成し、スクリプトコンポーネントとして magic_fx.go に追加します。
-- magic_fx.script
go.property("direction", hash("left"))

function init(self)
    msg.post("#", "lights_off")
    if self.direction == hash("left") then
        go.set(".", "euler.z", 0)
        go.animate(".", "euler.z", go.PLAYBACK_LOOP_FORWARD, 360,  go.EASING_LINEAR, 3 + math.random())
    else
        go.set(".", "euler.z", 0)
        go.animate(".", "euler.z", go.PLAYBACK_LOOP_FORWARD, -360,  go.EASING_LINEAR, 2 + math.random())
    end
end

function on_message(self, message_id, message, sender)
    if message_id == hash("lights_on") then
        msg.post("#light", "enable")
    elseif message_id == hash("lights_off") then
        msg.post("#light", "disable")
    end
end
これで、マジックブロックは make_magic メッセージを受信すると、2つの magic_fx ゲームオブジェクトを生成します。それぞれが逆方向に回転して、ブロックの内部で色が美しく動きます。また、画像 magic-sphere_layer4.png を使うスプライトを block.go に追加します。この画像は、生成したエフェクトよりも高い Z に配置し、魔法の球体の外殻、つまり「カバー」を描画します。

ブロックのゲームオブジェクトには、Factory コンポーネントを追加し、Prototype としてゲームオブジェクト magic_fx.go を使うように設定する必要があります。ブロックのスクリプトも lights_on と lights_off メッセージを受信し、生成したオブジェクトへ転送する必要があります。ブロックを削除するときには、生成したオブジェクトも削除する必要がある点に注意してください。これはブロックの final() 関数で処理します。これらの処理は、すべて block.script に記述します。
-- block.script
function init(self)
    go.set_scale_xy(0.18) -- render scaled down without changing Z

    self.fx1 = nil
    self.fx2 = nil

    msg.post("#cover", "disable")

    if self.color ~= nil then
        sprite.play_flipbook("#sprite", self.color)
    else
        msg.post("#sprite", "disable")
    end
end

function final(self)
    if self.fx1 ~= nil then
        go.delete(self.fx1)
    end

    if self.fx2 ~= nil then
        go.delete(self.fx2)
    end
end

function on_message(self, message_id, message, sender)
    if message_id == hash("make_magic") then
        self.color = hash("magic")
        msg.post("#cover", "enable")
        msg.post("#sprite", "enable")
        sprite.play_flipbook("#sprite", hash("magic-sphere_layer1"))

        self.fx1 = factory.create("#fxfactory", p, nil, { direction = hash("left") })
        self.fx2 = factory.create("#fxfactory", p, nil, { direction = hash("right") })

        go.set_parent(self.fx1, go.get_id())
        go.set_parent(self.fx2, go.get_id())

        go.set(self.fx1, "position.z", 0.01)
        go.set(self.fx1, "scale.xy", 1)
        go.set(self.fx2, "position.z", 0.02)
        go.set(self.fx2, "scale.xy", 1)
    elseif message_id == hash("lights_on") or message_id == hash("lights_off") then
        msg.post(self.fx1, message_id)
        msg.post(self.fx2, message_id)
    end
end
これでマジックブロックを作り、光らせることもできるようになりました。このエフェクトを使って、マジックブロックの隣に別のマジックブロックがあることを示します。

盤面にいくつかのマジックブロックが配置されるよう、盤面をブロックで埋めるコードを変更する必要があります。
-- board.script
local function build_board(self)

    ...

    -- Distribute magic blocks.
    local rand_x = 0
    local rand_y
    for y = 0, boardheight - 1, boardheight / self.num_magic do
        local set = false
        while not set do
            rand_y = math.random(math.floor(y), math.min(boardheight - 1, math.floor(y + boardheight / self.num_magic)))
            rand_x = math.random(0, boardwidth - 1)
            if self.board[rand_x][rand_y].color ~= hash("magic") then
                msg.post(self.board[rand_x][rand_y].id, "make_magic")
                self.board[rand_x][rand_y].color = hash("magic")
                set = true
            end
        end
    end

    -- Build 1d list that we can easily filter.
    build_blocklist(self)
end
マジックブロックの主な仕組みは、隣のブロックが消えると横に移動できることです。この仕組みの詳細をすべて、board.script の slide_magic_blocks() 関数に実装します。アルゴリズムはシンプルです。
- 盤面の各行について、マジックブロックのリスト
Mを作成します。 - リスト
M内の各マジックブロックを、リストの長さが縮まらなくなるまで繰り返し処理します。各反復では、次の処理を行います。- マジックブロックの下のブロック位置が
hash("removing")なら、そのマジックブロックをリストMから削除するだけです。 - マジックブロックの横に
hash("removing")とマークされた空きがあれば、そこへ移動させます。元の位置をhash("removing")に設定し、そのマジックブロックをリストMから削除します。
- マジックブロックの下のブロック位置が
-- board.script
-- Apply the shifting logic to magic blocks. Only slide to positions
-- marked for removal with hash("removing")
--
local function slide_magic_blocks(self)
    -- Slide all magic blocks to the side that should slide first.
    -- This works best going row by row!
    local row_m
    for y = 0,boardheight - 1 do
        row_m = {}
        -- Build list of magic blocks on this row.
        for x = 0,boardwidth - 1 do
            if self.board[x][y] ~= nil and self.board[x][y] ~= hash("removing") and self.board[x][y].color == hash("magic") then
                table.insert(row_m, self.board[x][y])
            end
        end

        local mc = #row_m + 1
        -- Go through list, slide and remove if possible. Reiterate until the list does not shrink.
        while #row_m < mc do
            mc = #row_m
            for i, m in pairs(row_m) do
                local x = m.x
                if y > 0 and self.board[x][y-1] == hash("removing") then
                    -- Hole below, do nothing.
                    row_m[i] = nil
                elseif x > 0 and self.board[x-1][y] == hash("removing") then
                    -- Hole to the left! Slide magic block there
                    self.board[x-1][y] = self.board[x][y]
                    self.board[x-1][y].x = x - 1
                    go.animate(self.board[x][y].id, "position.x", go.PLAYBACK_ONCE_FORWARD, edge + blocksize / 2 + blocksize * (x - 1), go.EASING_OUTBOUNCE, 0.3)
                    -- Calc new z
                    go.set(self.board[x][y].id, "position.z", (x - 1) * -0.1 + y * 0.01)
                    self.board[x][y] = hash("removing") -- Will be nilled later
                    row_m[i] = nil
                elseif x < boardwidth - 1 and self.board[x + 1][y] == hash("removing") then
                    -- Hole to the right. Slide magic block there
                    self.board[x+1][y] = self.board[x][y]
                    self.board[x+1][y].x = x + 1
                    go.animate(self.board[x+1][y].id, "position.x", go.PLAYBACK_ONCE_FORWARD, edge + blocksize / 2 + blocksize * (x + 1), go.EASING_OUTBOUNCE, 0.3)
                    -- Calc new z
                    go.set(self.board[x+1][y].id, "position.z", (x + 1) * -0.1 + y * 0.01)
                    self.board[x][y] = hash("removing") -- Will be nilled later
                    row_m[i] = nil
                end
            end
        end
    end
end
on_input() にこの関数の呼び出しを追加すると、この仕組みを試せます。
-- board.script
function on_input(self, action_id, action)

    ...

    elseif action_id == hash("touch") and action.released then
        -- Player released touch.
        self.dragging = false

        if #self.chain > 1 then
            -- There is a chain of blocks. Remove it from board
            remove_chain(self)
            slide_magic_blocks(self)
            nilremoved(self)
            -- Slide remaining blocks down.
            slide_board(self)
        end
        self.chain = {}
        -- Empty chain clears connector graphics.
        for i, c in ipairs(self.connectors) do
            go.delete(c)
        end
        self.connectors = {}
    end
これで、ブロックを削除するときに、その位置に中間状態を示す hash("removing") という「タグ」を使った理由がはっきりします。これがなければ、マジックブロックは横にあるどの空き位置にも移動し、左右に行ったり来たりしてしまいます。それはそれで面白い仕組みかもしれませんが、この小さなゲームで意図している動きではありません。
次に、マジックブロックがつながっているか(互いに上下左右の位置にあるか)を検出するロジックが必要です。また、盤面のすべてのマジックブロックがつながっているかどうかも知る必要があります。使うアルゴリズムは、とても単純です。
- 盤面にあるすべてのマジックブロックのリスト
Mを作成します。 - リスト
M内の各ブロックについて、次の処理を行います。- ブロックに
regionが設定されていなければ、領域番号R(初期値は1)を割り当てます。 - そのブロックに隣接する、まだマークされていないすべてのブロックを、同じ領域番号
Rでマークします。それらに隣接するブロック、さらにその隣のブロックというように、処理を繰り返します。 - 領域番号
Rを1増やします。
- ブロックに

このアルゴリズムの実装は、次のとおりです。
-- board.script
--
-- Build list of all current magic blocks.
--
local function magic_blocks(self)
    local magic = {}
    for x = 0,boardwidth - 1 do
        for y = 0,boardheight - 1 do
            if self.board[x][y] ~= nil and self.board[x][y].color == hash("magic") then
                table.insert(magic, self.board[x][y])
            end
        end
    end
    return magic
end

--
-- Filter out adjacent magic blocks
--
local function adjacent_magic_blocks(blocks, block)
    return filter(function (e)
        return (block.x == e.x and math.abs(block.y - e.y) == 1) or
            (block.y == e.y and math.abs(block.x - e.x) == 1)
    end, blocks)
end

--
-- Spread region to neighbors
--
local function mark_neighbors(blocks, block, region)
    local neighbors = adjacent_magic_blocks(blocks, block)
    for i, m in pairs(neighbors) do
        if m.region == nil then
            m.region = region
            mark_neighbors(blocks, m, region)
        end
    end
end

--
-- Mark all magic block regions
--
local function mark_magic_regions(self)
    local m_blocks = magic_blocks(self)
    -- 1. Clear all region marks and count neighbors
    for i, m in pairs(m_blocks) do
        m.region = nil
        local n = 0
        for _ in pairs(adjacent_magic_blocks(m_blocks, m)) do n = n + 1 end
        m.neighbors = n
    end

    -- 2. Assign regions and spread them
    local region = 1
    for i, m in pairs(m_blocks) do
        if m.region == nil then
            m.region = region
            mark_neighbors(m_blocks, m, region)
            region = region + 1
        end
    end
    return m_blocks
end
マジックブロックの領域数を数える関数も作成します。領域数が1なら、すべてのマジックブロックがつながっていると分かります。さらに、すべてのマジックブロックを消灯する関数と、隣に別のマジックブロックがあるマジックブロックの光のエフェクトを点灯する関数を追加します。
-- board.script
--
-- Count the number of connected regions among the magic blocks.
--
local function count_magic_regions(blocks)
    local maxr = 0
    for i, m in pairs(blocks) do
        if m.region > maxr then
            maxr = m.region
        end
    end
    return maxr
end

--
-- Shut off lights on all listed magic blocks
--
local function shutdown_lined_up_magic(self)
    for i, m in ipairs(self.lined_up_magic) do
        msg.post(m.id, "lights_off")
    end
end

--
-- Set highlight for all magic blocks
--
local function highlight_magic(blocks)
    for i, m in pairs(blocks) do
        if m.neighbors > 0 then
            msg.post(m.id, "lights_on")
        else
            msg.post(m.id, "lights_off")
        end
    end
end
これで、これらのロジックを全体の流れに組み込めます。まず、盤面はランダムに生成されるため、わずかな確率で最初からクリア状態になることがあります。その場合は、盤面を破棄して作り直します。
-- board.script
--
-- Clear the board
--
local function clear_board(self)
    for y = 0,boardheight - 1 do
        for x = 0,boardwidth - 1 do
            if self.board[x][y] ~= nil then
                go.delete(self.board[x][y].id)
                self.board[x][y] = nil
            end
        end
    end
end

local function build_board(self)

    ...

    -- Build 1d list that we can easily filter.
    build_blocklist(self)

    local magic_blocks = mark_magic_regions(self)
    if count_magic_regions(magic_blocks) == 1 then
        -- "Win" from start. Make new board.
        clear_board(self)
        build_board(self)
    end
    highlight_magic(magic_blocks)
end
残りのロジックは on_input() に収まります。level_completed メッセージを処理するコードはまだありませんが、今のところは問題ありません。
-- board.script
function on_input(self, action_id, action)

    ...

    elseif action_id == hash("touch") and action.released then
        -- Player released touch.
        self.dragging = false

        if #self.chain > 1 then
            -- There is a chain of blocks. Remove it from board and refill board.
            remove_chain(self)
            slide_magic_blocks(self)
            nilremoved(self)
            -- Slide remaining blocks down.
            slide_board(self)

            local magic_blocks = mark_magic_regions(self)
            -- Highlight adjacent magic blocks.
            if count_magic_regions(magic_blocks) == 1 then
                -- Win!
                msg.post("#", "level_completed")
            end
            highlight_magic(magic_blocks)
        end
        self.chain = {}
        -- Empty chain clears connector graphics.
        for i, c in ipairs(self.connectors) do
            go.delete(c)
        end
        self.connectors = {}
    end
これで、ゲームをプレイしてクリア状態に到達できるようになりました。ただし、すべてのマジックブロックをつないでも、まだ何も起こりません。

ドロップ
「ドロップ」は、シンプルな進行の仕組みを加えるためのものです。プレイヤーが DROP ボタンを押すと、ランダムな新しいブロックをいくつか盤面に落とす「ドロップ」を、限られた回数だけ実行できます。開始時に使えるドロップは1回で、レベルをクリアするたびに1回追加されます。ドロップの仕組みを実装するコードは、2つの関数に収まります。1つはドロップしたブロックが収まる可能性のある位置のリストを返し、もう1つはアニメーションを含めて実際のドロップを行います。
-- board.script
--
-- Find spots for a drop.
--
local function dropspots(self)
    local spots = {}
    for x = 0, boardwidth - 1 do
        for y = 0, boardheight - 1 do
            if self.board[x][y] == nil then
                table.insert(spots, { x = x, y = y })
                break
            end
        end
    end
    -- If more than dropamount, randomly remove a slot until dropamount
    for c = 1, #spots - dropamount do
        table.remove(spots, math.random(#spots))
    end
    return spots
end

--
-- Perform the drop
--
local function drop(self, spots)
    for i, s in pairs(spots) do
        local pos = vmath.vector3()
        pos.x = edge + blocksize / 2 + blocksize * s.x
        pos.y = 1000
        c = colors[math.random(#colors)]    -- Pick a random color
        local id = factory.create("#blockfactory", pos, null, { color = c })
        go.animate(id, "position.y", go.PLAYBACK_ONCE_FORWARD, bottom_edge + blocksize / 2 + blocksize * s.y, go.EASING_OUTBOUNCE, 0.5)
        -- Calc new z
        go.set(id, "position.z", s.x * -0.1 + s.y * 0.01)

        self.board[s.x][s.y] = { id = id, color = c,  x = s.x, y = s.y }
    end

    -- Rebuild blocklist
    build_blocklist(self)
end
たとえば on_reload() で次のコードを実行するか、一時的な入力アクションに割り当てることで、ドロップをテストできます。
s = dropspots(self)
if #s > 0 then
    -- Do the drop
    drop(self, s)
end

メインメニュー
いよいよ、全体をまとめます。まずスタート画面を作り、盤面から分離します。最初の手順は main_menu.gui を作成し、Start ボタン(テキストノードとテクスチャ付きのボックスノード)、タイトル用のテキストノード、装飾用のブロック(テクスチャ付きのボックスノード)を配置することです。GUI にアタッチするスクリプト main_menu.gui_script は、init() で装飾用ブロックをアニメーションさせます。また、メインスクリプトに start_game メッセージを送信する on_input() も含めます。そのメインスクリプトは、すぐ後で作成します。

-- main_menu.gui_script
function init(self)
    msg.post(".", "acquire_input_focus")

    local bs = { "brick1", "brick2", "brick3", "brick4", "brick5", "brick6" }
    for i, b in ipairs(bs) do
        local n = gui.get_node(b)
        local rt = (math.random() * 3) + 1
        local a = math.random(-45, 45)
        gui.set_color(n, vmath.vector4(1, 1, 1, 0))

        gui.animate(n, "position.y", -100 - math.random(0, 50), gui.EASING_INSINE, 1 + rt, 0, nil, gui.PLAYBACK_LOOP_FORWARD)
        gui.animate(n, "color.w", 1, gui.EASING_INSINE, 1 + rt, 0, nil, gui.PLAYBACK_LOOP_FORWARD)
        gui.animate(n, "rotation.z", a, gui.EASING_INSINE, 1 + rt, 0, nil, gui.PLAYBACK_LOOP_FORWARD)
    end

    gui.animate(gui.get_node("start"), "color.x", 1, gui.EASING_INOUTSINE, 1, 0, nil, gui.PLAYBACK_LOOP_PINGPONG)
end

function on_input(self, action_id, action)
    if action_id == hash("touch") and action.pressed then
        local start = gui.get_node("start")

        if gui.pick_node(start, action.x, action.y) then
            msg.post("/main#script", "start_game")
        end
    end
end
ゲームを開始する処理は、まもなくメインメニューのスクリプトが担当するようになります。そのため、board.script の init() から、盤面を設定する一時的な呼び出しを削除します。
-- board.script
--
-- INIT
--
function init(self)
    self.board = {}                -- Contains the board structure
    self.blocks = {}            -- List of all blocks. Used for easy filtering on selection.

    self.chain = {}                -- Current selection chain
    self.connectors = {}        -- Connector elements to mark the selection chain
    self.num_magic = 3            -- Number of magic blocks on the board

    self.drops = 1                -- Number of drops you have available

    self.magic_blocks = {}        -- Magic blocks that are lined up

    self.dragging = false        -- Drag touch input
end
メインスクリプトはゲーム全体の状態を保持し、要求に応じてゲームを開始します。ここでは、main.collection に、起動時の表示に必要な最小限のアセットだけを含めるようにします。そのために、main.collection に「main」ゲームオブジェクトを置き、メインメニューの GUI、スクリプトコンポーネント、そして特に重要な Collection Proxy コンポーネントを持たせます。
コレクションプロキシ(collection proxy)を使うと、実行中のゲームでコレクションを動的に読み込んだり、アンロードしたりできます。コレクションプロキシは指定したコレクションファイルの代理として機能し、プロキシにメッセージを送信することで、動的なコレクションの読み込み、初期化、有効化、無効化、アンロードを行います。使い方の詳しい説明は、コレクションプロキシのドキュメントを参照してください。
ここでは、コレクションプロキシコンポーネントの Collection プロパティに、「レベル」を含む board.collection を設定します。

ここで game.project を開き、起動時に読み込むコレクションを指定する main_collection を /main/main.collectionc に変更します。

これで、ゲームの開始時にはコレクションプロキシにメッセージを送り、盤面を読み込み、初期化して有効にしてから、メインメニューを無効にして非表示にします。メインメニューに戻るときは、逆の処理を行います(プロキシがコレクションを読み込み済みであることが前提です)。
-- main.script
function init(self)
    msg.post("#", "to_main_menu")
    self.state = "MAIN_MENU"
end

function on_message(self, message_id, message, sender)
    if message_id == hash("to_main_menu") then
        if self.state ~= "MAIN_MENU" then
            msg.post("#boardproxy", "unload")
        end
        msg.post("main:/main#menu", "enable") -- <1>
        self.state = "MAIN_MENU"
    elseif message_id == hash("start_game") then
        msg.post("#boardproxy", "load")
        msg.post("#menu", "disable")
    elseif message_id == hash("proxy_loaded") then
        -- Board collection has loaded...
        msg.post(sender, "init")
        msg.post("board:/board#script", "start_level", { difficulty = 1 }) -- <2>
        msg.post(sender, "enable")
        self.state = "GAME_RUNNING"
    end
end
- ソケットを「main」と呼んでいる点に注意してください。main.collection に、この名前を設定しておく必要があります。ルートノードを選択し、Name プロパティが「main」であることを確認します。
- 同様に、読み込んだコレクションには、そのソケットを通じてメッセージを送信します。ソケットの名前は、コレクションの Name プロパティで設定します。
ゲーム内の GUI
盤面のスクリプトに最後のロジックを追加する前に、盤面に GUI 要素をいくつか追加します。まず、盤面の上部に RESTART ボタンと DROP ボタンを追加します。

盤面の GUI スクリプトは、クリック時にやり直し用の GUI ダイアログ要素へメッセージを送信し、DROP がクリックされたときは盤面のスクリプト自身にメッセージを送信します。
-- board.gui_script
function init(self)
    msg.post("#", "show")
    msg.post("/restart#gui", "hide")
    msg.post("/level_complete#gui", "hide")
end

function on_message(self, message_id, message, sender)
    if message_id == hash("hide") then
        msg.post("#", "disable")
    elseif message_id == hash("show") then
        msg.post("#", "enable")
    elseif message_id == hash("set_drop_counter") then
        local n = gui.get_node("drop_counter")
        gui.set_text(n, message.drops .. " x")
    end
end

function on_input(self, action_id, action)
    if action_id == hash("touch") and action.pressed then
        local restart = gui.get_node("restart")
        local drop = gui.get_node("drop")

        if gui.pick_node(restart, action.x, action.y) then
            -- Show the restart dialog box.
            msg.post("/restart#gui", "show")
            msg.post("#", "hide")
        elseif gui.pick_node(drop, action.x, action.y) then
            msg.post("/board#script", "drop")
        end
    end
end
RESTART ダイアログはシンプルです。restart.gui として作成し、簡単なスクリプトをアタッチします。プレイヤーが NO をクリックした場合は何もせず、YES をクリックした場合は盤面のスクリプトへ restart_level メッセージを送信し、Quit to main menu をクリックした場合はメインスクリプトへ to_main_menu メッセージを送信します。

-- restart.gui_script
function on_message(self, message_id, message, sender)
    if message_id == hash("hide") then
        msg.post("#", "disable")
        msg.post(".", "release_input_focus")
    elseif message_id == hash("show") then
        msg.post("#", "enable")
        msg.post(".", "acquire_input_focus")
    end
end

function on_input(self, action_id, action)
    if action_id == hash("touch") and action.pressed then
        local yes = gui.get_node("yes")
        local no = gui.get_node("no")
        local quit = gui.get_node("quit")

        if gui.pick_node(no, action.x, action.y) then
            msg.post("#", "hide")
            msg.post("/board#gui", "show")
        elseif gui.pick_node(yes, action.x, action.y) then
            msg.post("board:/board#script", "restart_level")
            msg.post("/board#gui", "show")
            msg.post("#", "hide")
        elseif gui.pick_node(quit, action.x, action.y) then
            msg.post("main:/main#script", "to_main_menu")
            msg.post("#", "hide")
        end
    end
    -- Consume all input until we're gone.
    return true
end
level_complete.gui にレベルクリア用のシンプルな GUI ダイアログも作成します。プレイヤーが CONTINUE をクリックすると、盤面のスクリプトへ next_level メッセージを送信する簡単なスクリプトを付けます。

-- level_complete.gui_script
function init(self)
    msg.post("#", "hide")
end

function on_message(self, message_id, message, sender)
    if message_id == hash("hide") then
        msg.post("#", "disable")
        msg.post(".", "release_input_focus")
    elseif message_id == hash("show") then
        msg.post("#", "enable")
        msg.post(".", "acquire_input_focus")
    end
end

function on_input(self, action_id, action)
    if action_id == hash("touch") and action.pressed then
        local continue = gui.get_node("continue")

        if gui.pick_node(continue, action.x, action.y) then
            msg.post("board#script", "next_level")
            msg.post("#", "hide")
        end
    end
    -- Consume all input until we're gone.
    return true
end
現在のレベルを表示するためのダイアログには、表示と非表示の処理だけを含むスクリプトを付けます。表示時には、現在の難易度を含むメッセージをダイアログに設定します。

-- present_level.gui_script
function init(self)
    msg.post("#", "hide")
end

function on_message(self, message_id, message, sender)
    if message_id == hash("hide") then
        msg.post("#", "disable")
    elseif message_id == hash("show") then
        local n = gui.get_node("message")
        gui.set_text(n, "Level " .. message.level)
        msg.post("#", "enable")
    end
end
プレイヤーがドロップしようとしても、そのための空きがない場合に表示するダイアログも追加します。

-- no_drop_room.gui_script
function init(self)
    msg.post("#", "hide")
    self.t = 0
end

function update(self, dt)
    if self.t < 0 then
        msg.post("#", "hide")
    else
        self.t = self.t - dt
    end
end

function on_message(self, message_id, message, sender)
    if message_id == hash("hide") then
        msg.post("#", "disable")
    elseif message_id == hash("show") then
        self.t = 1
        msg.post("#", "enable")
    end
end
最後に、これらの GUI コンポーネントを board.collection に追加し、必要なコードを board.script に追加します。

on_message() に、盤面との間で送受信されるすべてのメッセージを処理するコードが必要です。
start_level- 難易度パラメーターに応じてマジックブロックの数を設定し、盤面を作成します。その後、「present_level」GUI ダイアログを2秒間表示してから、ゲームを開始します(ダイアログを取り除き、入力フォーカスを取得します)。ほかには使わない「timer」の値をアニメーションさせることで、
go.animate()をタイマーとして使っている点に注意してください。 restart_level- プレイヤーが GUI の RESTART ボタンを押し、確認したときの処理です。盤面を空にして作り直し、ドロップのカウンターをリセットします。
level_completed- 盤面がクリア状態になると、すぐに送信されます。入力を無効にし、マジックブロックをアニメーションさせて、「level_complete」GUI ダイアログを表示します。プレイヤーがダイアログの CONTINUE ボタンをクリックすると、ダイアログは
next_levelメッセージを返します。 next_level- このメッセージを受信したら、盤面を空にし、ドロップのカウンターを増やして、次の難易度を設定した
start_levelを送信します。 drop- ドロップできる位置を確認します。ドロップできる位置がなければ、「no_drop_room」GUI ダイアログを表示します。そうでなければ、プレイヤーの残りドロップ回数がある場合にドロップを実行し、ドロップのカウンターを減らして、カウンターの表示を更新します。
-- board.script
function on_message(self, message_id, message, sender)
    if message_id == hash("start_level") then
        self.num_magic = message.difficulty + 1
        build_board(self)

        msg.post("#gui", "set_drop_counter", { drops = self.drops } )

        msg.post("present_level#gui", "show", { level = message.difficulty } )
        -- Wait some...
        go.animate("#", "timer", go.PLAYBACK_ONCE_FORWARD, 1, go.EASING_LINEAR, 2, 0, function ()
            msg.post("present_level#gui", "hide")
            msg.post(".", "acquire_input_focus")
        end)
    elseif message_id == hash("restart_level") then
        clear_board(self)
        build_board(self)
        self.drops = 1
        msg.post("#gui", "set_drop_counter", { drops = self.drops } )
        msg.post(".", "acquire_input_focus")
    elseif message_id == hash("level_completed") then
        -- turn off input
        msg.post(".", "release_input_focus")

        -- Animate the magic!
        for i, m in ipairs(magic_blocks(self)) do
            go.set_scale_xy(0.17, m.id)
            go.animate(m.id, "scale.xy", go.PLAYBACK_LOOP_PINGPONG, 0.19, go.EASING_INSINE, 0.5, 0)
        end

        -- Show completion screen
        msg.post("level_complete#gui", "show")
    elseif message_id == hash("next_level") then
        clear_board(self)
        self.drops = self.drops + 1
        -- Difficulty level is number of magic blocks - 1
        msg.post("#", "start_level", { difficulty = self.num_magic })
    elseif message_id == hash("drop") then
        s = dropspots(self)
        if #s == 0 then
            -- Can't perform drop
            msg.post("no_drop_room#gui", "show")
        elseif self.drops > 0 then
            -- Do the drop
            drop(self, s)
            self.drops = self.drops - 1
            msg.post("#gui", "set_drop_counter", { drops = self.drops } )
        end
    end
end
これでゲームも、このチュートリアルも完成です!ぜひゲームをプレイして楽しんでください!

次のステップ
この小さなゲームには興味深い特徴がいくつかあるので、ぜひいろいろと試してみてください。Defold にさらに慣れるために、次の課題に取り組めます。
- 操作を分かりやすくします。初めてのプレイヤーは、ゲームの仕組みや操作できるものを理解しにくいかもしれません。チュートリアル要素を追加せずに、ゲームを分かりやすくする工夫をしてみてください。
- 音を追加します。現在のゲームにはまったく音がないため、心地よいサウンドトラックや操作音を加えるとよくなります。
- ゲームオーバーを自動で検出します。
- ハイスコアを追加します。保存して次回も利用できるハイスコア機能を実装します。
- GUI API だけを使ってゲームを再実装します。
- 現在は、レベルが1つ上がるたびにマジックブロックを1個追加してゲームが続きます。しかし、この方法をいつまでも続けることはできません。この問題に対する納得のいく解決策を考えてみてください。
- ゲームを最適化し、スプライトを削除して再生成する代わりに再利用することで、スプライトの最大数を減らします。
- 解像度に依存しない描画を実装し、解像度やアスペクト比が異なる画面でも、同じように見栄えよく表示されるようにします。