

This translation is community contributed and may not be up to date. We only maintain the English version of the documentation. Read this tutorial in English
プラットフォーマー
この記事では、Defold でタイルを使った基本的な 2D プラットフォーマー(platformer)を実装する方法を説明します。左右への移動、ジャンプ、落下の仕組みを学びます。
プラットフォーマーの作り方には、さまざまな方法があります。Rodrigo Monteiro が、このテーマや関連事項を徹底的に分析した記事をこちらに公開しています。
役立つ情報が豊富にあるため、初めてプラットフォーマーを作る場合は、ぜひ読んでみてください。ここでは、その記事で紹介されている手法のいくつかと、Defold での実装方法をもう少し詳しく説明します。ただし、すべての内容は、他のプラットフォームや言語にも容易に移植できるはずです(Defold では Lua を使います)。
ベクトルの数学(線形代数)をある程度理解していることを前提とします。ゲーム開発で非常に役立つので、詳しくない場合は学んでおくことをお勧めします。Wolfire の David Rosen が、このテーマについてとても優れた連載をこちらに公開しています。
すでに Defold を使っている場合は、Platformer テンプレートプロジェクトを基に新しいプロジェクトを作り、この記事を読みながら試すことができます。
一部の読者から、ここで紹介する方法は Box2D の標準実装では使えないとの指摘がありました。この方法を使えるようにするため、Box2D にいくつかの変更を加えました。
キネマティックオブジェクト(kinematic object)と静的オブジェクト(static object)の間の衝突は無視されます。b2Body::ShouldCollide と b2ContactManager::Collide のチェックを変更します。
また、接触距離(Box2D では separation と呼ばれます)は、コールバック関数に渡されません。
b2ManifoldPoint に距離を表すメンバーを追加し、b2Collide* 関数で更新されるようにします。
衝突判定
プレイヤーがレベルの形状(level geometry)をすり抜けないようにするには、衝突判定(collision detection)が必要です。 ゲームやその固有の要件に応じて、いくつもの対処方法があります。 可能であれば、物理エンジン(physics engine)に任せるのが最も簡単な方法の1つです。 Defold では、2D ゲームに物理エンジンの Box2D を使っています。 Box2D の標準実装には必要な機能がすべて揃っているわけではありません。どのように変更したかについては、この記事の末尾を参照してください。
物理エンジンは、物理的な振る舞いをシミュレーションするために、物理オブジェクトの状態と形状を保存します。また、シミュレーション中に衝突を報告するので、ゲームは衝突が起きたときに対応できます。ほとんどの物理エンジンには、静的 オブジェクト、動的 オブジェクト(dynamic object)、キネマティック オブジェクトの3種類があります(他の物理エンジンでは、これらの名前が異なる場合があります)。他にも種類はありますが、ここでは扱いません。
- 静的 オブジェクトは移動しません(例: レベルの形状)。
- 動的 オブジェクトは力やトルクの影響を受け、それらはシミュレーション中に速度に変換されます。
- キネマティック オブジェクトはアプリケーションのロジックで制御されますが、他の動的オブジェクトに影響を与えます。
このようなゲームでは、現実世界の物理的な振る舞いに似た動きを目指しますが、反応のよい操作性とバランスの取れた仕組みのほうがはるかに重要です。気持ちのよいジャンプは、物理的に正確である必要も、現実世界の重力の下で動く必要もありません。ただし、こちらの分析によれば、Mario のゲームの重力は、バージョンを重ねるごとに 9.8 m/s2 に近づいているそうです。:-)
狙った体験を実現するために仕組みを設計、調整できるよう、起きていることを完全に制御できることが重要です。そのため、プレイヤーキャラクターをキネマティックオブジェクトとして表すことにします。こうすれば、物理的な力を扱う必要がなく、プレイヤーキャラクターを自由に動かせます。その代わり、キャラクターとレベルの形状が重なったときに引き離す処理を自分で実装する必要があります(詳しくは後述します)が、これは受け入れられる欠点です。物理ワールド(physics world)では、プレイヤーキャラクターをボックス形状で表します。
移動
プレイヤーキャラクターをキネマティックオブジェクトで表すことにしたので、位置を設定して自由に動かせます。まずは左右への移動から始めましょう。
キャラクターに重みを感じさせるため、加速度に基づいて移動させます。通常の乗り物と同じように、加速度はプレイヤーキャラクターが最高速度に達するまでの速さや、方向を変える速さを決めます。加速度をフレームの時間刻みであるタイムステップ(time step)にわたって作用させ、その結果を速度に加えます。このタイムステップは通常、パラメーター dt(デルタ-t)で渡されます。同じように、速度をフレームにわたって作用させ、その結果の平行移動量を位置に加えます。数学では、これを時間についての積分と呼びます。
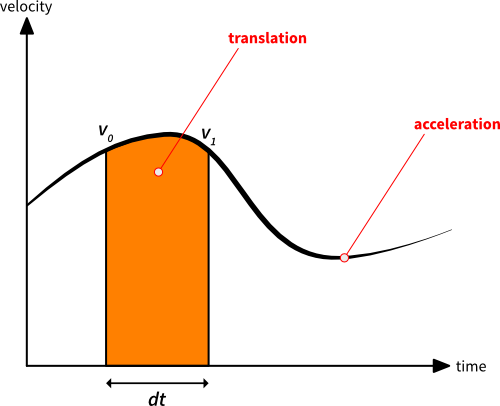
2本の縦線は、フレームの開始と終了を表します。線の高さは、その2つの時点でのプレイヤーキャラクターの速度です。これらの速度を v0 と v1 とします。v1 は、タイムステップ dt にわたって加速度(曲線の傾き)を作用させることで求められます。

オレンジ色の領域は、現在のフレームでプレイヤーキャラクターに適用する平行移動量です。幾何学的には、この面積を次のように近似できます。

更新ループで加速度と速度を積分し、キャラクターを動かす手順は次のとおりです。
- 入力に基づいて目標速度を決めます。
- 現在の速度と目標速度の差を計算します。
- その差の方向に作用するよう加速度を設定します。
-
上記のように、このフレームの速度変化量を計算します(
dvは delta-velocity(速度変化量)の略です)。local dv = acceleration * dt dvが意図した速度差を超えるか確認し、超える場合はその値に制限します。-
後で使うために現在の速度を保存します(この時点の
self.velocityは、前のフレームで使った速度です)。local v0 = self.velocity -
速度変化量を加えて、新しい速度を計算します。
self.velocity = self.velocity + dv -
上記のように速度を積分して、このフレームの x 方向の平行移動量を計算します。
local dx = (v0 + self.velocity) * dt * 0.5 - その平行移動量をプレイヤーキャラクターに適用します。
Defold での入力の扱い方が分からない場合は、こちらのガイドを参照してください。
この段階で、キャラクターを左右に動かせるようになり、重みがあり滑らかな操作感が得られます。次は重力を加えましょう!
重力も加速度ですが、プレイヤーに y 軸方向に作用します。そのため、上記の移動の加速度と同じ方法で適用できます。上記の計算をベクトルに変更し、手順3)で加速度の y 成分に重力を含めるだけで動作します。ベクトルの数学は便利ですね!:-)
衝突への応答
プレイヤーキャラクターが移動、落下できるようになったので、次は衝突への応答(collision response)を見ていきます。 当然、レベルの形状に着地し、それに沿って移動する必要があります。物理エンジンから渡される接触点(contact point)を使い、何とも重ならないようにします。
接触点には、接触の 法線(normal)と、他のオブジェクトにどれだけめり込んだかを示す 距離 が含まれています。法線は衝突相手のオブジェクトの外側を向いていますが、他のエンジンでは異なる場合があります。プレイヤーをレベルの形状から引き離すには、これだけあれば十分です。 ボックスを使っているため、1フレームで複数の接触点が得られる場合があります。たとえば、ボックスの2つの角が水平な地面と交差している場合や、プレイヤーが隅に入り込む場合に起きます。
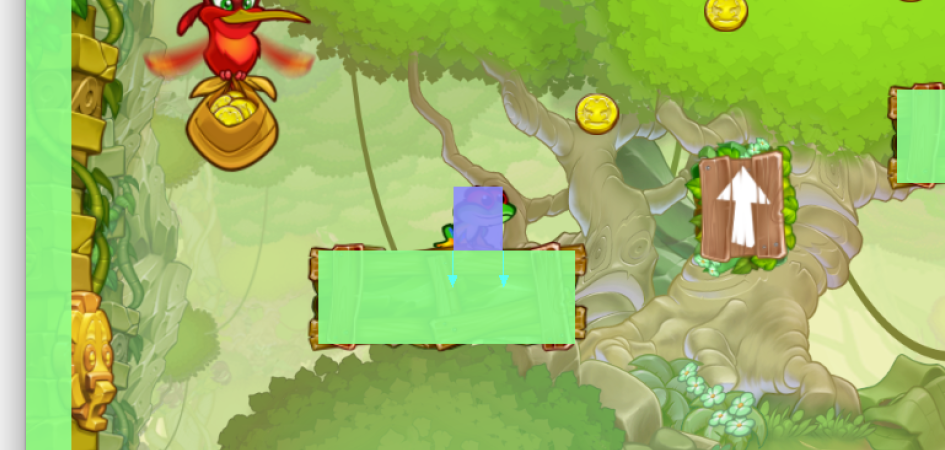
同じ修正を何度も行わないように、修正量をベクトルに累積し、過剰に補正しないようにします。補正しすぎると、衝突相手のオブジェクトから離れすぎてしまいます。上の画像では、2本の矢印(法線)で示される2つの接触点があることが分かります。どちらの接触もめり込み距離は同じなので、毎回その値をそのまま使うと、プレイヤーを意図した量の2倍移動させてしまいます。
累積した修正量は、毎フレーム、ゼロベクトルにリセットすることが重要です。
update() 関数の末尾に、次のような処理を入れます。
self.corrections = vmath.vector3()
接触点ごとに呼び出されるコールバック関数があるとすると、その関数内で引き離す処理は次のようになります。
local proj = vmath.dot(self.correction, normal) -- <1>
local comp = (distance - proj) * normal -- <2>
self.correction = self.correction + comp -- <3>
go.set_position(go.get_position() + comp) -- <4>
- 修正ベクトルを接触法線に投影します(最初の接触点では、修正ベクトルはゼロベクトルです)。
- この接触点に必要な補正量を計算します。
- その値を修正ベクトルに加えます。
- 補正量をプレイヤーキャラクターに適用します。
プレイヤーの速度のうち、接触点に向かう成分を打ち消す必要もあります。
proj = vmath.dot(self.velocity, message.normal) -- <1>
if proj < 0 then
    self.velocity = self.velocity - proj * message.normal -- <2>
end
- 速度を法線に投影します。
- 投影の値が負の場合は、速度の一部が接触点に向かっていることを意味するので、その成分を取り除きます。
ジャンプ
レベルの形状の上を走ったり、落下したりできるようになったので、次はジャンプです!プラットフォーマーのジャンプは、さまざまな方法で実装できます。このゲームでは、Super Mario Bros や Super Meat Boy に似た動きを目指します。ジャンプするときは、力積(impulse)、つまり基本的には一定の速度を与えて、プレイヤーキャラクターを上向きに押し出します。
重力が継続してキャラクターを下へ引き戻すことで、きれいなジャンプの弧が生まれます。空中にいる間も、プレイヤーはキャラクターを操作できます。ジャンプの弧の頂点に達する前にジャンプボタンを離すと、上向きの速度を縮小して、ジャンプを早めに打ち切ります。
-
入力が押されたときに、次を実行します。
 -- jump_takeoff_speed is a constant defined elsewhere
 self.velocity.y = jump_takeoff_speed
この処理は、入力が 押された ときだけ実行します。押し続けられている 間の毎フレームに実行するものではありません。
-
入力が離されたときに、次を実行します。
 -- cut the jump short if we are still going up
 if self.velocity.y > 0 then
     -- scale down the upwards speed
     self.velocity.y = self.velocity.y * 0.5
 end
ExciteMike が、Super Mario Bros 3 と Super Meat Boy のジャンプの弧を分かりやすいグラフにしているので、ぜひ見てみてください。
レベルの形状
レベルの形状とは、プレイヤーキャラクター(場合によっては他のものも)が衝突する環境のコリジョン形状(collision shape)のことです。Defold には、この形状を作る方法が2つあります。
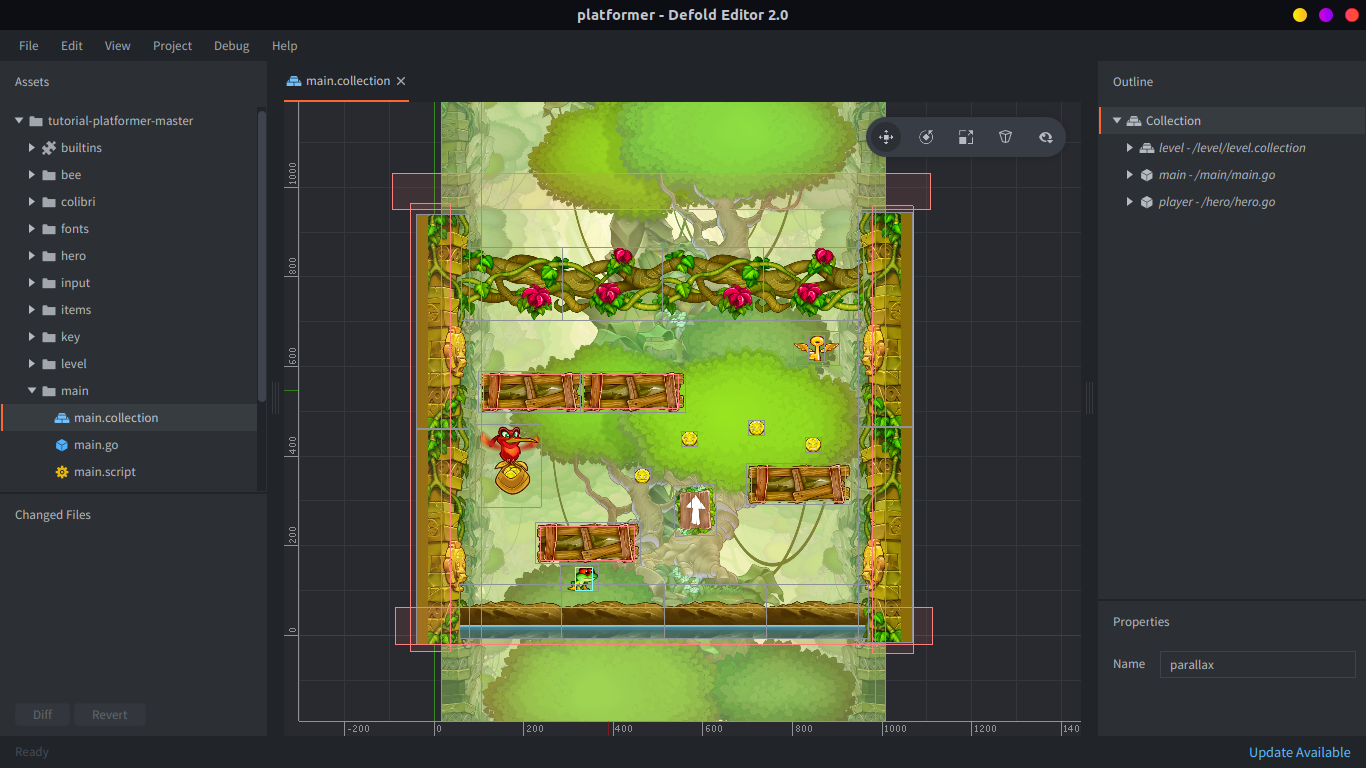
1つは、作成したレベルの上に個別のコリジョン形状を配置する方法です。この方法はとても柔軟で、グラフィックスの位置を細かく調整できます。特に緩やかな坂を作りたい場合に役立ちます。 Braid はこの方法でレベルを作成しており、このチュートリアルのサンプルレベルでも同じ方法を使っています。Defold エディターでは、次のように表示されます。
もう1つは、タイルでレベルを組み立て、タイルのグラフィックスに基づいて、エディターに物理形状を自動生成させる方法です。レベルを変更するとレベルの形状も自動更新されるので、非常に役立つ場合があります。
配置したタイルの物理形状は、境界が合っていれば自動的に1つに結合されます。 これにより、水平に並んだ複数のタイルを滑るように移動するときに、プレイヤーキャラクターが止まったり、引っかかったりする原因となる隙間がなくなります。この処理は、読み込み時に、Box2D でタイルのポリゴンをエッジ形状に置き換えることで行います。
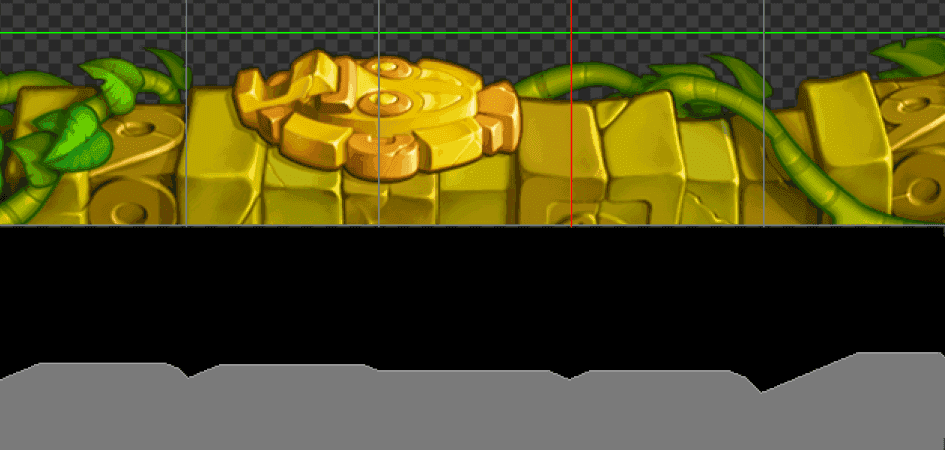
上の例では、プラットフォーマーのグラフィックスの一部から、隣り合う5つのタイルを作成しています。画像では、配置したタイル(上)が、1つにつなぎ合わせた形状(下の灰色の輪郭)に対応する様子が分かります。
おわりに
プラットフォーマーの仕組みについてもっと詳しく知りたい場合は、Sonic の物理挙動について、驚くほど大量の情報がまとめられています。
このテンプレートプロジェクトを iOS デバイスやマウスで試すと、ジャンプの操作感がとても不自然に感じられるかもしれません。 これは、1つのタッチ入力でプラットフォーマーを操作しようとした、不十分な試みです。:-)
このゲームでアニメーションをどのように扱っているかは説明しませんでした。下の player.script にある update_animations() 関数を見ると、その方法が分かります。
この記事がお役に立てば幸いです! みんなが遊べるように、ぜひすてきなプラットフォーマーを作ってください!<3
コード
player.script の内容は次のとおりです。
-- player.script

-- these are the tweaks for the mechanics, feel free to change them for a different feeling
-- the acceleration to move right/left
local move_acceleration = 3500
-- acceleration factor to use when air-borne
local air_acceleration_factor = 0.8
-- max speed right/left
local max_speed = 450
-- gravity pulling the player down in pixel units
local gravity = -1000
-- take-off speed when jumping in pixel units
local jump_takeoff_speed = 550
-- time within a double tap must occur to be considered a jump (only used for mouse/touch controls)
local touch_jump_timeout = 0.2

-- prehashing ids improves performance
local msg_contact_point_response = hash("contact_point_response")
local msg_animation_done = hash("animation_done")
local group_obstacle = hash("obstacle")
local input_left = hash("left")
local input_right = hash("right")
local input_jump = hash("jump")
local input_touch = hash("touch")
local anim_run = hash("run")
local anim_idle = hash("idle")
local anim_jump = hash("jump")
local anim_fall = hash("fall")

function init(self)
    -- this lets us handle input in this script
    msg.post(".", "acquire_input_focus")

    -- initial player velocity
    self.velocity = vmath.vector3(0, 0, 0)
    -- support variable to keep track of collisions and separation
    self.correction = vmath.vector3()
    -- if the player stands on ground or not
    self.ground_contact = false
    -- movement input in the range [-1,1]
    self.move_input = 0
    -- the currently playing animation
    self.anim = nil
    -- timer that controls the jump-window when using mouse/touch
    self.touch_jump_timer = 0
end

local function play_animation(self, anim)
    -- only play animations which are not already playing
    if self.anim ~= anim then
        -- tell the sprite to play the animation
        sprite.play_flipbook("#sprite", anim)
        -- remember which animation is playing
        self.anim = anim
    end
end

local function update_animations(self)
    -- make sure the player character faces the right way
    sprite.set_hflip("#sprite", self.move_input < 0)
    -- make sure the right animation is playing
    if self.ground_contact then
        if self.velocity.x == 0 then
            play_animation(self, anim_idle)
        else
            play_animation(self, anim_run)
        end
    else
        if self.velocity.y > 0 then
            play_animation(self, anim_jump)
        else
            play_animation(self, anim_fall)
        end
    end
end

function update(self, dt)
    -- determine the target speed based on input
    local target_speed = self.move_input * max_speed
    -- calculate the difference between our current speed and the target speed
    local speed_diff = target_speed - self.velocity.x
    -- the complete acceleration to integrate over this frame
    local acceleration = vmath.vector3(0, gravity, 0)
    if speed_diff ~= 0 then
        -- set the acceleration to work in the direction of the difference
        if speed_diff < 0 then
            acceleration.x = -move_acceleration
        else
            acceleration.x = move_acceleration
        end
        -- decrease the acceleration when air-borne to give a slower feel
        if not self.ground_contact then
            acceleration.x = air_acceleration_factor * acceleration.x
        end
    end
    -- calculate the velocity change this frame (dv is short for delta-velocity)
    local dv = acceleration * dt
    -- check if dv exceeds the intended speed difference, clamp it in that case
    if math.abs(dv.x) > math.abs(speed_diff) then
        dv.x = speed_diff
    end
    -- save the current velocity for later use
    -- (self.velocity, which right now is the velocity used the previous frame)
    local v0 = self.velocity
    -- calculate the new velocity by adding the velocity change
    self.velocity = self.velocity + dv
    -- calculate the translation this frame by integrating the velocity
    local dp = (v0 + self.velocity) * dt * 0.5
    -- apply it to the player character
    go.set_position(go.get_position() + dp)

    -- update the jump timer
    if self.touch_jump_timer > 0 then
        self.touch_jump_timer = self.touch_jump_timer - dt
    end

    update_animations(self)

    -- reset volatile state
    self.correction = vmath.vector3()
    self.move_input = 0
    self.ground_contact = false

end

local function handle_obstacle_contact(self, normal, distance)
    -- project the correction vector onto the contact normal
    -- (the correction vector is the 0-vector for the first contact point)
    local proj = vmath.dot(self.correction, normal)
    -- calculate the compensation we need to make for this contact point
    local comp = (distance - proj) * normal
    -- add it to the correction vector
    self.correction = self.correction + comp
    -- apply the compensation to the player character
    go.set_position(go.get_position() + comp)
    -- check if the normal points enough up to consider the player standing on the ground
    -- (0.7 is roughly equal to 45 degrees deviation from pure vertical direction)
    if normal.y > 0.7 then
        self.ground_contact = true
    end
    -- project the velocity onto the normal
    proj = vmath.dot(self.velocity, normal)
    -- if the projection is negative, it means that some of the velocity points towards the contact point
    if proj < 0 then
        -- remove that component in that case
        self.velocity = self.velocity - proj * normal
    end
end

function on_message(self, message_id, message, sender)
    -- check if we received a contact point message
    if message_id == msg_contact_point_response then
        -- check that the object is something we consider an obstacle
        if message.group == group_obstacle then
            handle_obstacle_contact(self, message.normal, message.distance)
        end
    end
end

local function jump(self)
    -- only allow jump from ground
    -- (extend this with a counter to do things like double-jumps)
    if self.ground_contact then
        -- set take-off speed
        self.velocity.y = jump_takeoff_speed
        -- play animation
        play_animation(self, anim_jump)
    end
end

local function abort_jump(self)
    -- cut the jump short if we are still going up
    if self.velocity.y > 0 then
        -- scale down the upwards speed
        self.velocity.y = self.velocity.y * 0.5
    end
end

function on_input(self, action_id, action)
    if action_id == input_left then
        self.move_input = -action.value
    elseif action_id == input_right then
        self.move_input = action.value
    elseif action_id == input_jump then
        if action.pressed then
            jump(self)
        elseif action.released then
            abort_jump(self)
        end
    elseif action_id == input_touch then
        -- move towards the touch-point
        local diff = action.x - go.get_position().x
        -- only give input when far away (more than 10 pixels)
        if math.abs(diff) > 10 then
            -- slow down when less than 100 pixels away
            self.move_input = diff / 100
            -- clamp input to [-1,1]
            self.move_input = math.min(1, math.max(-1, self.move_input))
        end
        if action.released then
            -- start timing the last release to see if we are about to jump
            self.touch_jump_timer = touch_jump_timeout
        elseif action.pressed then
            -- jump on double tap
            if self.touch_jump_timer > 0 then
                jump(self)
            end
        end
    end
end