

This translation is community contributed and may not be up to date. We only maintain the English version of the documentation. Read this tutorial in English
車を作る
Defold を初めて使う方に向けて、エディターの基本的な使い方を紹介します。また、Defold の基本的な考え方と、よく使う基本構成要素であるゲームオブジェクト(game object)、コレクション(collection)、スクリプト(script)、スプライト(sprite)について説明します。
空のプロジェクトから始めて、実際に遊べる小さなアプリケーションを段階的に作っていきます。最後まで進めると、Defold の仕組みをつかみ、より本格的なチュートリアルに取り組んだり、マニュアルを読み進めたりする準備ができるはずです。
このチュートリアルでは、概念や特定の操作についての詳しい説明を、この段落のように示します。説明が細かすぎると感じたら、読み飛ばしてください。
新しいプロジェクトを作成する

- Defold を起動します。
- 左側で New Project を選択します。
- From Template タブを選択します。
- Empty Project を選択します。
- ローカルドライブ上のプロジェクトの保存場所を選択します。
- Create New Project をクリックします。
エディター
まず、新しいプロジェクトを作成して、エディターで開きます。main/main.collection ファイルをダブルクリックすると、次のようにファイルが開きます。

エディターは、次の主な領域で構成されています。
- Assets pane
- プロジェクト内のすべてのファイルを表示するビューです。ファイルの種類ごとに異なるアイコンが表示されます。ファイルをダブルクリックすると、その種類に対応したエディターで開きます。読み取り専用の特別なフォルダー builtins はすべてのプロジェクトで共通で、既定のレンダースクリプト(render script)、フォント、さまざまなコンポーネント(component)を描画するためのマテリアルなど、便利なものが含まれています。
- Main Editor View
- 編集しているファイルの種類に応じて、その種類に対応するエディターが表示されます。最もよく使うのは、ここに表示されているシーンエディターです。開いている各ファイルは、それぞれ別のタブに表示されます。
- Changed Files
- 現在の Git コミットと比較して、ローカルで追加、変更、名前変更、削除されたファイルが表示されます。ここでテキストの差分を確認したり、ローカルの変更を元に戻したりできます。リモートリポジトリと同期するには、外部の Git クライアントまたはコマンドラインを使います。
- Outline
- 現在編集中のファイルの内容を階層表示します。このビューから、オブジェクトやコンポーネントの追加、削除、変更、選択ができます。
- Properties
- 現在選択しているオブジェクトやコンポーネントに設定されたプロパティです。
- Console
- ゲームの実行中に、ゲームエンジンからの出力(ログ、エラー、デバッグ情報など)と、スクリプトで独自に出力した
print()やpprint()のデバッグメッセージが表示されます。アプリケーションやゲームが起動しない場合は、最初にコンソールを確認します。コンソールの背後には、エラー情報を表示するタブや、パーティクルエフェクトの作成に使うカーブエディターのタブがあります。
ゲームを実行する
「Empty」プロジェクトテンプレートは、実際に中身が完全に空です。それでも、Project ▸ Build を選択してプロジェクトをビルドし、ゲームを起動してみます。

黒い画面だけではあまり面白くないかもしれませんが、これも実行中の Defold ゲームアプリケーションです。少し手を加えれば、簡単にもっと面白いものにできます。それでは始めましょう。
Defold エディターでは、ファイルを対象に作業します。Assets pane でファイルをダブルクリックすると、適切なエディターで開き、ファイルの内容を編集できます。
ファイルの編集が終わったら、保存する必要があります。メインメニューで File ▸ Save を選択します。未保存の変更があるファイルには、エディターが目印としてタブのファイル名にアスタリスク「*」を付けます。

車を組み立てる
最初に、新しいコレクションを作成します。コレクションは、位置を決めて配置したゲームオブジェクトをまとめる入れ物です。最もよく使われる用途はゲームのレベルの作成ですが、ひとまとまりのゲームオブジェクトのグループや階層を再利用したい場合にも、とても便利です。コレクションは、プレハブ(prefab)の一種と考えると分かりやすいかもしれません。
Assets pane で main フォルダーをクリックし、右クリックして New ▸ Collection File を選択します。メインメニューから File ▸ New ▸ Collection File を選択することもできます。

新しいコレクションファイルに car.collection という名前を付けて開きます。この新しい空のコレクションを使い、いくつかのゲームオブジェクトから小さな車を組み立てます。ゲームオブジェクトは、ゲームを構成するコンポーネント(スプライト、サウンド、ロジックを記述したスクリプトなど)をまとめる入れ物です。各ゲームオブジェクトは、ゲーム内で id によって一意に識別されます。ゲームオブジェクト同士は、メッセージによる通信であるメッセージパッシング(message passing)を通じてやり取りできます。これについては後で詳しく説明します。
また、ここで行ったように、コレクション内にその場でゲームオブジェクトを追加する(in-place)こともできます。この方法で作成されるのは、その場所だけに存在するオブジェクトです。コピーはできますが、それぞれは独立しているため、1つを変更してもほかには影響しません。つまり、ゲームオブジェクトを10個コピーしてからすべてを変更したくなった場合は、そのオブジェクトのインスタンス(instance)を10個とも編集する必要があります。そのため、その場で追加するゲームオブジェクトは、大量にコピーする予定のないものに使うことをお勧めします。
一方、ファイル に保存したゲームオブジェクトは、プロトタイプ(prototype)として機能します(他のエンジンでは「プレハブ」や「設計図(blueprint)」とも呼ばれます)。ファイルに保存したゲームオブジェクトのインスタンスをコレクションに配置すると、各オブジェクトは 参照として 追加されます。つまり、プロトタイプを基にした複製です。プロトタイプを変更すると、それを基に配置したすべてのゲームオブジェクトが即座に更新されます。

Outline ビューでルートの「Collection」ノードを選択し、右クリックして Add Game Object を選択します。id が「go」の新しいゲームオブジェクトがコレクションに表示されます。それを選択し、Properties ビューで id を「car」に設定します。今のところ、「car」はあまり面白いものではありません。中身は空で、見た目もロジックもありません。見た目を追加するには、スプライトの コンポーネント を追加する必要があります。
コンポーネントは、ゲームオブジェクトに表現(グラフィックス、サウンド)や機能(生成用のファクトリー(factory)、衝突、スクリプトで定義した動作)を追加するために使います。コンポーネントは単独では存在できず、ゲームオブジェクトの中に置く必要があります。通常は、ゲームオブジェクトと同じファイル内のその場で定義します。ただし、コンポーネントを再利用したい場合は、ゲームオブジェクトと同様に別のファイルに保存し、任意のゲームオブジェクトファイルに参照として含めることができます。Lua スクリプトなど、一部の種類のコンポーネントは、別のコンポーネントファイルに保存してから、オブジェクトに参照として含める必要があります。
コンポーネントを直接操作するわけではないことに注意してください。コンポーネントを含むゲームオブジェクトに対して、移動、回転、拡大縮小、プロパティのアニメーションを行います。

「car」ゲームオブジェクトを選択し、右クリックして Add Component を選択したら、Sprite を選択して Ok をクリックします。Outline ビューでスプライトを選択すると、いくつかのプロパティを設定する必要があることが分かります。
- Image
- スプライトの画像ソースを指定する必要があります。Assets pane ビューで「main」を選択し、右クリックして New ▸ Atlas File を選択し、アトラス(atlas)の画像ファイルを作成します。新しいアトラスファイルに sprites.atlas という名前を付け、ダブルクリックしてアトラスエディターで開きます。次の2つの画像ファイルをコンピューターに保存し、Assets pane ビューの main にドラッグします。次に、アトラスエディターで Atlas ルートノードを選択し、右クリックして Add Images を選択できます。車とタイヤの画像をアトラスに追加して保存します。これで、「car」コレクションの「car」ゲームオブジェクト内にあるスプライトコンポーネントの画像ソースに sprites.atlas を選択できます。
このゲームで使う画像です。


これらの画像をアトラスに追加します。


- Default Animation
- 「car」(または車の画像に付けた名前)に設定します。各スプライトには、ゲーム内で表示されたときに再生する既定のアニメーションが必要です。アトラスに画像を追加すると、Defold が画像ファイルごとに1フレームの静止アニメーションを自動的に作成してくれます。
車を完成させる
続いて、コレクションにゲームオブジェクトをさらに2つ追加します。「left_wheel」と「right_wheel」という名前を付け、それぞれにスプライトコンポーネントを追加して、sprites.atlas に追加したタイヤの画像を表示します。次に、車輪のゲームオブジェクトをつかんで「car」にドロップし、「car」の子にします。別のゲームオブジェクトの子になっているゲームオブジェクトは、親が移動すると一緒に移動します。個別に動かすこともできますが、すべての移動は親オブジェクトを基準にした相対的な移動になります。タイヤを車に取り付けたまま、ハンドル操作に合わせて少し左右に回転させたいので、この仕組みはぴったりです。コレクションには任意の数のゲームオブジェクトを含めることができ、並列に配置したり、複雑な親子ツリーにしたり、それらを組み合わせたりできます。
タイヤのゲームオブジェクトを選択し、Scene ▸ Move Tool を選択して適切な位置に移動します。矢印のハンドル、または中央の緑の四角をつかんで、オブジェクトを適切な場所に動かします。最後に、タイヤが車の下に描画されるようにする必要があります。そのために、位置の Z 成分を -0.5 に設定します。ゲーム内の表示要素はすべて、Z 値で並べ替えられ、奥から手前の順に描画されます。Z 値が 0 のオブジェクトは、Z 値が -0.5 のオブジェクトより上に描画されます。車のゲームオブジェクトの既定の Z 値は 0 なので、タイヤのオブジェクトに新しい値を設定すると、車の画像の下に表示されます。
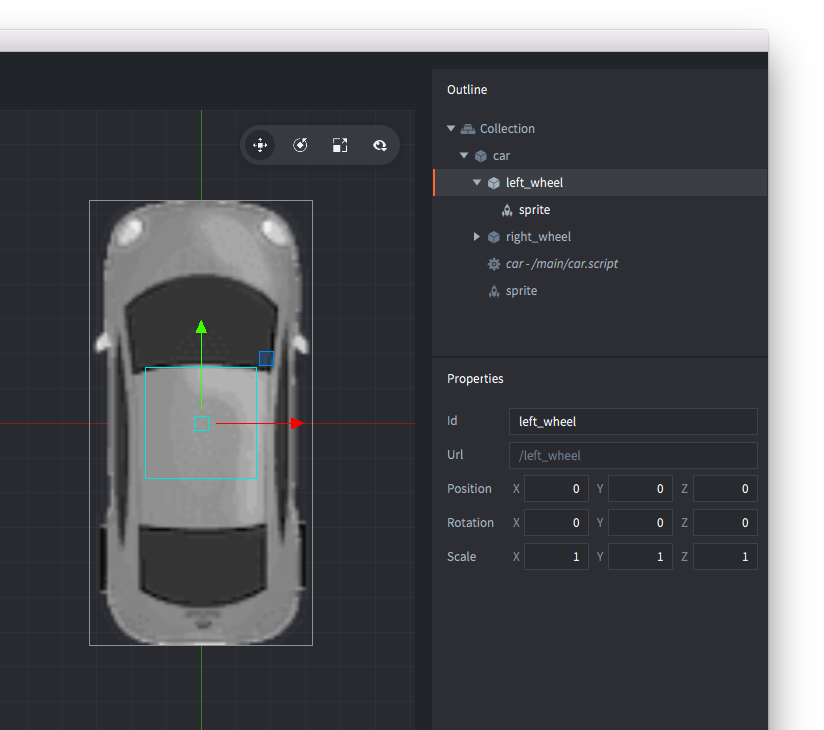
車のスクリプト
最後の仕上げは、車を制御する スクリプト です。スクリプトは、ゲームオブジェクトの動作を定義するプログラムを含むコンポーネントです。スクリプトを使うと、ゲームのルールや、プレイヤーやほかのオブジェクトとのさまざまなやり取りに対して、オブジェクトがどのように反応するかを指定できます。すべてのスクリプトは Lua プログラミング言語で書きます。Defold を使って開発するには、自分かチームの誰かが Lua でのプログラミングを学ぶ必要があります。
Assets pane で「main」を選択し、右クリックして New ▸ Script File を選択します。新しいファイルに car.script という名前を付けます。次に、Outline ビューで「car」を選択し、右クリックして Add Component File を選択し、「car」ゲームオブジェクトに追加します。car.script を選択して OK をクリックします。コレクションファイルを保存します。
car.script をダブルクリックして開きます。
Defold には、ゲームロジックを記述するためのライフサイクル関数がいくつか用意されています。詳しくはスクリプトマニュアルを参照してください。
まず、final、on_message、on_reload 関数を削除します。
このチュートリアルでは使わないためです。
次に、init 関数の開始位置より前に、次のコードを追加します。
-- Constants
local turn_speed = 0.1                           									  -- Slerp factor
local max_steer_angle_left = vmath.quat_rotation_z(math.pi / 6)     -- 30 degrees
local max_steer_angle_right = vmath.quat_rotation_z(-math.pi / 6)   -- -30 degrees
local steer_angle_zero = vmath.quat_rotation_z(0)									  -- Zero degrees
local wheels_vector = vmath.vector3(0, 72, 0)         		        	-- Vector from center of back and front wheel pairs

local acceleration = 100 																						-- The acceleration of the car

-- prehash the inputs
local left = hash("left")
local right = hash("right")
local accelerate = hash("accelerate")
local brake = hash("brake")
ここで行った変更は、とても単純です。後で車の動作を実装するときに使う定数(constants)を、スクリプトにいくつか追加しただけです。
あらかじめハッシュ値を変数に保存している点に注目してください。このようにするとコードが読みやすくなり、パフォーマンスも向上するため、よい習慣です。
次に、init 関数を次の内容に編集します。
function init(self)
	-- Send a message to the render script (see builtins/render/default.render_script) to set the clear color.
	-- This changes the background color of the game. The vector4 contains color information
	-- by channel from 0-1: Red = 0.2. Green = 0.2, Blue = 0.2 and Alpha = 1.0
	msg.post("@render:", "clear_color", { color = vmath.vector4(0.2, 0.2, 0.2, 1.0) } )		--<1>

	-- Acquire input focus so we can react to input
	msg.post(".", "acquire_input_focus")		-- <2>

	-- Some variables
	self.steer_angle = vmath.quat()				 -- <3>
	self.direction = vmath.quat()

	-- Velocity and acceleration are car relative (not rotated)
	self.velocity = vmath.vector3()
	self.acceleration = vmath.vector3()

	-- Input vector. This is modified later in the on_input function
	-- to store the input.
	self.input = vmath.vector3()
end
何を変更したのか気になりますか?それぞれ説明します。
- レンダースクリプトにメッセージを送信し、背景色を灰色に設定するよう求めます。レンダースクリプトは、オブジェクトを画面にどのように表示するかを制御する、Defold の特別なスクリプトです。
- スクリプトコンポーネントや GUI スクリプトで入力アクションを受け取るには、そのコンポーネントを含むゲームオブジェクトに
acquire_input_focusメッセージを送信する必要があります。ここでは、車のスクリプトを含むゲームオブジェクトにこのメッセージを送信します。 - 次に、車の現在の状態を記録するために使う変数をいくつか宣言します。
ここまでは簡単でしたね。続いて、update 関数を次の内容に編集します。
function update(self, dt)
	-- Set acceleration to the y input
	self.acceleration.y = self.input.y * acceleration				-- <1>

	-- Calculate the new positions of front and back wheels
	local front_vel = vmath.rotate(self.steer_angle, self.velocity)
	local new_front_pos = vmath.rotate(self.direction, wheels_vector + front_vel)
	local new_back_pos = vmath.rotate(self.direction, self.velocity)								-- <2>

	-- Calculate the car's new direction
	local new_dir = vmath.normalize(new_front_pos - new_back_pos)
	self.direction = vmath.quat_rotation_z(math.atan2(new_dir.y, new_dir.x) - math.pi / 2)			-- <3>

	-- Calculate new velocity based on current acceleration
	self.velocity = self.velocity + self.acceleration * dt			-- <4>

	-- Update position based on current velocity and direction
	local pos = go.get_position()
	pos = pos + vmath.rotate(self.direction, self.velocity)
	go.set_position(pos)																			-- <5>

	-- Interpolate the wheels using vmath.slerp
	if self.input.x > 0 then																		-- <6>
		self.steer_angle = vmath.slerp(turn_speed, self.steer_angle, max_steer_angle_right)
	elseif self.input.x < 0 then
		self.steer_angle = vmath.slerp(turn_speed, self.steer_angle, max_steer_angle_left)
	else
		self.steer_angle = vmath.slerp(turn_speed, self.steer_angle, steer_angle_zero)
	end

	-- Update the wheel rotation
	go.set_rotation(self.steer_angle, "left_wheel")					-- <7>
	go.set_rotation(self.steer_angle, "right_wheel")

	-- Set the game object's rotation to the direction
	go.set_rotation(self.direction)

	-- reset acceleration and input
	self.acceleration = vmath.vector3()								-- <8>
	self.input = vmath.vector3()
end
長い関数になりましたが、心配はいりません。各部分の動作は次のとおりです。
- まず、入力ベクトルに基づいて加速度ベクトルを設定します。これにより、車の加速方向が入力の方向に一致します。
- 次に、後輪は常に前方に移動し、前輪は向きを変えた方向に移動するという単純な考え方に基づいて、前後それぞれの車輪の変位を計算します。
- 前後の車輪の変位に基づいて、車の新しい進行方向を計算します。
- ここでは、計算した加速度を速度に加えます。
- 最後に、現在の速度に基づいて車の位置を更新します。
- 左右の入力に基づいて、slerp によって操舵角を補間します。入力が変わるたびに車輪の向きが瞬時に切り替わるのを防ぐためです。
- 次に、車の現在の操舵角に基づいて車輪の回転を設定します。同様に、現在の進行方向に基づいて車の回転を設定します。
- 最後に、加速度ベクトルと入力ベクトルをリセットします。
いよいよ、車が入力に反応するようにします。on_input 関数を次のように変更します。
function on_input(self, action_id, action)
	-- set the input vector to correspond to the key press
	if action_id == left then
		self.input.x = -1
	elseif action_id == right then
		self.input.x = 1
	elseif action_id == accelerate then
		self.input.y = 1
	elseif action_id == brake then
		self.input.y = -1
	end
end
この関数はとても単純で、入力を受け取り、入力ベクトルを設定するだけです。
編集した内容を忘れずに保存してください。
入力
入力アクションがまだ設定されていないので、設定しましょう。/input/game.input_bindings ファイルを開き、「accelerate」、「brake」、「left」、「right」の key_trigger 入力バインディング(input binding)を追加します。ここでは、矢印キー(KEY_LEFT、KEY_RIGHT、KEY_UP、KEY_DOWN)に割り当てます。

車をゲームに追加する
これで車を走らせる準備ができました。「car.collection」の中に車を作成しましたが、まだゲーム内には存在しません。現在、エンジンが起動時に読み込むのは「main.collection」だからです。これを解決するには、car.collection を main.collection に追加するだけです。main.collection を開き、Outline ビューでルートの「Collection」ノードを選択し、右クリックして Add Collection From File を選択します。car.collection を選択して OK をクリックします。これで、car.collection の内容が新しいインスタンスとして main.collection に配置されます。car.collection の内容を変更すると、ゲームのビルド時にコレクションの各インスタンスが自動的に更新されます。

それでは、Project ▸ Build を選択して、作った車を走らせてみましょう! 車を思いどおりに動かせるようになったことが分かります。ただ、まだ何かが違います。操作をやめても、本来止まるはずの車が止まりません。この動作を追加しましょう!
抗力を加えて減速させる
現実の世界で物体が動くと、抗力(drag)が運動を妨げる方向に働き、物体を減速させます。この力は、動く物体の速度の2乗にほぼ比例するため、D = k * |V| * V と表せます。ここで、k は定数、V は速度、|V| はその大きさ(速さ)です。これを追加しましょう。
スクリプトの先頭にある定数の部分に、次の定数を追加します。
local drag = 1.1 --the drag constant <1>
次に、update 関数の次の行のすぐ上に、その下に示すコードを追加して、ファイルを保存します。
function update(self, dt)
	...
  -- Calculate new velocity based on current acceleration
	self.velocity = self.velocity + self.acceleration * dt
	...
end
function update(self, dt)
	...
	-- Speed is the magnitude of the velocity
	local speed = vmath.length_sqr(self.velocity)

	-- Apply drag
	self.acceleration = self.acceleration - speed * self.velocity * drag

	-- Stop if we are already slow enough
	if speed < 0.5 then self.velocity = vmath.vector3(0) end
	...
end
- 抗力の値を定数として宣言します。
- 移動する速さを計算します。
- 数式に基づいて、現在の加速度に抗力を適用します。
- 車がすでに十分遅くなっていれば、停止させます。
完成した車のスクリプト
ここまでの手順を終えると、car.script は次のようになります。
local turn_speed = 0.1                           				          	-- Slerp factor
local max_steer_angle_left = vmath.quat_rotation_z(math.pi / 6)	    -- 30 degrees
local max_steer_angle_right = vmath.quat_rotation_z(-math.pi / 6)   -- -30 degrees
local steer_angle_zero = vmath.quat_rotation_z(0)				          	-- Zero degrees
local wheels_vector = vmath.vector3(0, 72, 0)         				      -- Vector from center of back and front wheel pairs

local acceleration = 100 		                      									-- The acceleration of the car
local drag = 1.1                                                  	-- the drag constant

function init(self)
	-- Send a message to the render script (see builtins/render/default.render_script) to set the clear color.
	-- This changes the background color of the game. The vector4 contains color information
	-- by channel from 0-1: Red = 0.2. Green = 0.2, Blue = 0.2 and Alpha = 1.0
	msg.post("@render:", "clear_color", { color = vmath.vector4(0.2, 0.2, 0.2, 1.0) } )

	-- Acquire input focus so we can react to input
	msg.post(".", "acquire_input_focus")

	-- Some variables
	self.steer_angle = vmath.quat()
	self.direction = vmath.quat()

	-- Velocity and acceleration are car relative (not rotated)
	self.velocity = vmath.vector3()
	self.acceleration = vmath.vector3()

	-- Input vector. This is modified later in the on_input function
	-- to store the input.
	self.input = vmath.vector3()
end

function update(self, dt)
	-- Set acceleration to the y input
	self.acceleration.y = self.input.y * acceleration

	-- Calculate the new positions of front and back wheels
	local front_vel = vmath.rotate(self.steer_angle, self.velocity)
	local new_front_pos = vmath.rotate(self.direction, wheels_vector + front_vel)
	local new_back_pos = vmath.rotate(self.direction, self.velocity)

	-- Calculate the car's new direction
	local new_dir = vmath.normalize(new_front_pos - new_back_pos)
	self.direction = vmath.quat_rotation_z(math.atan2(new_dir.y, new_dir.x) - math.pi / 2)

	-- Speed is the magnitude of the velocity
	local speed = vmath.length(self.velocity)

	-- Apply drag
	self.acceleration = self.acceleration - speed * self.velocity * drag

	-- Stop if we are already slow enough
	if speed < 0.5 then self.velocity = vmath.vector3() end

	-- Calculate new velocity based on current acceleration
	self.velocity = self.velocity + self.acceleration * dt

	-- Update position based on current velocity and direction
	local pos = go.get_position()
	pos = pos + vmath.rotate(self.direction, self.velocity)
	go.set_position(pos)

	-- Interpolate the wheels using vmath.slerp
	if self.input.x > 0 then
		self.steer_angle = vmath.slerp(turn_speed, self.steer_angle, max_steer_angle_right)
	elseif self.input.x < 0 then
		self.steer_angle = vmath.slerp(turn_speed, self.steer_angle, max_steer_angle_left)
	else
		self.steer_angle = vmath.slerp(turn_speed, self.steer_angle, steer_angle_zero)
	end

	-- Update the wheel rotation
	go.set_rotation(self.steer_angle, "left_wheel")
	go.set_rotation(self.steer_angle, "right_wheel")

	-- Set the game object's rotation to the direction
	go.set_rotation(self.direction)

	-- reset acceleration and input
	self.acceleration = vmath.vector3()
	self.input = vmath.vector3()
end

function on_input(self, action_id, action)
	-- set the input vector to correspond to the key press
	if action_id == hash("left") then
		self.input.x = -1
	elseif action_id == hash("right") then
		self.input.x = 1
	elseif action_id == hash("accelerate") then
		self.input.y = 1
	elseif action_id == hash("brake") then
		self.input.y = -1
	end
end
完成したゲームを試す
それでは、メインメニューで Project ▸ Build を選択して、作った車を走らせてみましょう!
これで入門チュートリアルは終わりです。自分で取り組んでみたい方のために、いくつかの課題を用意しました。
- 現在、車は前進と後退のどちらも同じ加速度で動きます。後退するときには、よりゆっくり動くように変更してみましょう。
- 加速度などの定数の一部をプロパティ(
properties)にして、車のインスタンスごとに変更できるようにします。 - 車にサウンドを追加して、エンジン音を響かせましょう!(ヒント)
それでは、Defold をさらに使い込んでみてください。学習を手助けするマニュアルやチュートリアルをたくさん用意しています。困ったときは、ぜひフォーラムにお越しください。
Defold での制作を楽しんでください!