Spine animation
Spine is a third party animation tool by Esoteric Software. Spine animation provides 2D skeletal animation support (see http://en.wikipedia.org/wiki/Skeletal_animation). This is a fundamentally different technique from flipbook animations that is closer to cutout animation. In cutout animation separate pieces of the animated object (e.g body parts, eyes, mouth etc) are moved individually between each frame. Spine animation let you build an invisible, virtual skeleton consisting of a hierarchy of interconnected bones. This skeleton, or rig, is then animated and individual images are attached to the bones. Defold supports animations created or exported in the Spine JSON format. Skeletal animation is very smooth since the engine can interpolate the location of each bone for each frame. It is particularly useful to animate characters and animals, but works very well for other types of objects, like ropes, vehicles or foliage.
Requirements
Installation
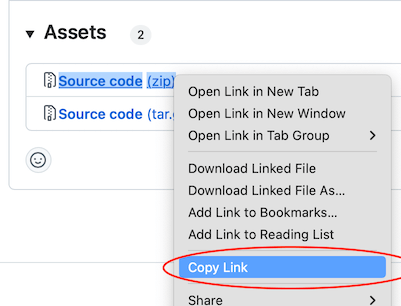
To use this library in your Defold project, add the needed version URL to your game.project dependencies from Releases:
Migration guide
Spine animations used to be part of the main Defold engine. Starting with Defold version 1.2.193 Spine animations have been moved from the engine into a Defold extension. To upgrade to the new version you need to make a few changes to your project.
Spine content
- The new file suffix is
.spinejson- Set this as the output suffix in the Spine Editor
- Update the spine source files to latest version
-
The new runtime is based on Spine 4.1.xx
-
NOTE: The old spine version json files won’t work as they are too old!
-
-
Update the
.spinescenefiles in the project replacing the.jsonreference to the corresponding.spinejsonfile-
Either manually update your
.spinescenefiles in the editor -
Use search-and-replace in a text editor
-
Use this python3 script to update do the search and replace for you. The script only replaces the suffix from
.jsonto.spinejson:<project root>: python3 ./defold-spine/misc/migrate.py -
TIP: It’s easiest if the new files has the same name and casing as the old files!
-
-
Update any materials if you’ve made your custom spine materials
-
The materials + shaders now live in the
extension-spine -
The material now uses the
world_view_projmatrix for transforming the vertices
-
GameObject
-
spine.set_skin(url, name)now takes one argument, the name of the skin- The new
spine.set_attachment(url, slot, attachment)allows you to set an attachment to a slot
- The new
-
spine.play_anim()etc are now synchronous. -
If a callback is set to
spine.play_anim()it will now receive all spine events (e.g. foot steps etc)
GUI
- The Lua callbacks have a new signature, to make them more consistent with the game object callbacks
local function spine_callback(self, node, event, data)
    pprint("SPINE CALLBACK", node, event, data)
end
- Currently the play anim requires a callback (i.e. the default handler is currently disabled)
Concepts
- Spine JSON data file
- This data file contains the skeleton, all the image slot names, skins and the actual animation data. No images are embedded in this file though. Create this file from your animation software of choice.
- Spine scene
- The Defold resource tying together the Spine JSON data file and the Defold image atlas file that is used to fill bone slots with graphics.
- Spine model
- The SpineModel component is put in a game object to bring the graphics and animation to the screen. The component contains the skeleton game object hierarchy, which animation to play, what skin to use and it also specifies the material used for rendering the model.
- Spine Node
- If using Spine animation in a GUI scene, use Spine GUI nodes instead of Spine model components. See the GUI documentation below to learn more.
Animation tools
The Spine JSON data format that Defold supports can be created by Esoteric Software’s Spine software.
Spine is available from Esoteric Software.
Importing a Spine character and animations
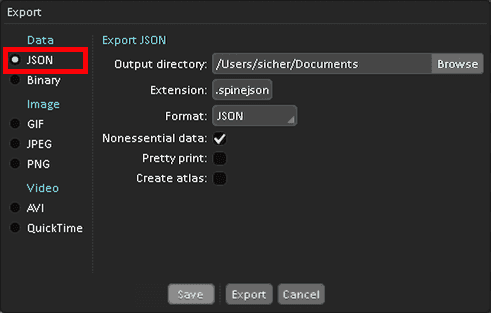
When you have a model and animations that you have created in Spine, the process of importing them into Defold is straightforward:
- Export a Spine JSON version of the animation data. Make sure the extension is
.spinejson. - Put the exported JSON file somewhere in your project hierarchy.
- Put all images associated with the model somewhere in your project hierarchy.
- Create an Atlas file and add all the images to it. (See 2D graphics documentation for details on how to create an atlas and below for some caveats)
When you have the animation data and image files imported and set up in Defold, you need to create a Spine scene resource file:
- Create a new Spine scene resource file (Select New ▸ Spine Scene File from the main menu)
- The new file opens in the spine scene editor.
- Set the Properties.
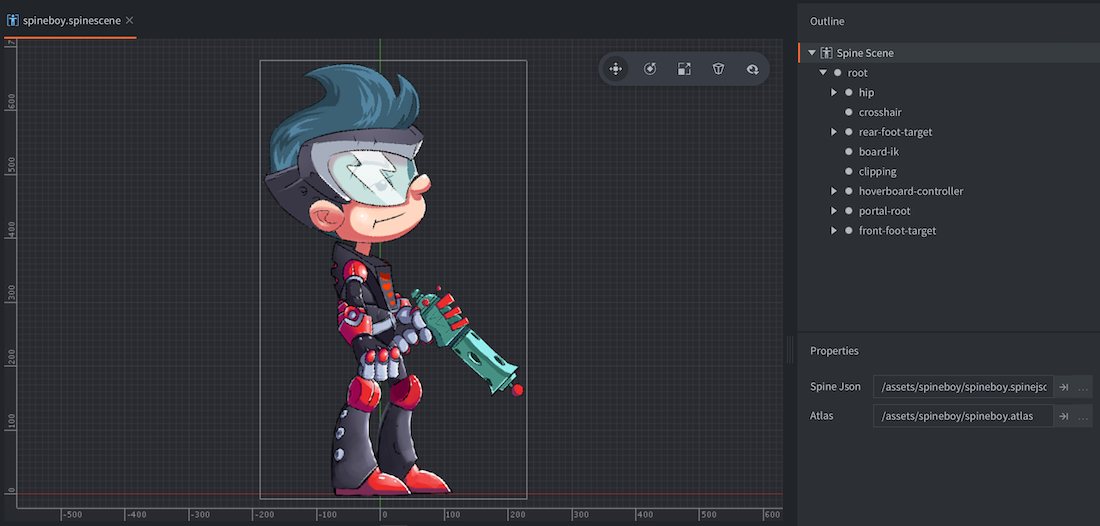
- Spine Json
- The Spine JSON file to use as source for bone and animation data (Note: the file must have extension
.spinejson). - Atlas
- The atlas containing images named corresponding to the Spine data file.
Project configuration
The game.project file has a few project settings related to spine models.
Creating Spine model components
Select a game object to hold the new component:
Either create the component in-place (right click the game object and select Add Component ▸ Spine Model)
Or create it on file first (right click a location in the Assets browser, then select New... ▸ Spine Model from the context menu), then add the file to the game object by right clicking the game object and selecting Add Component File).
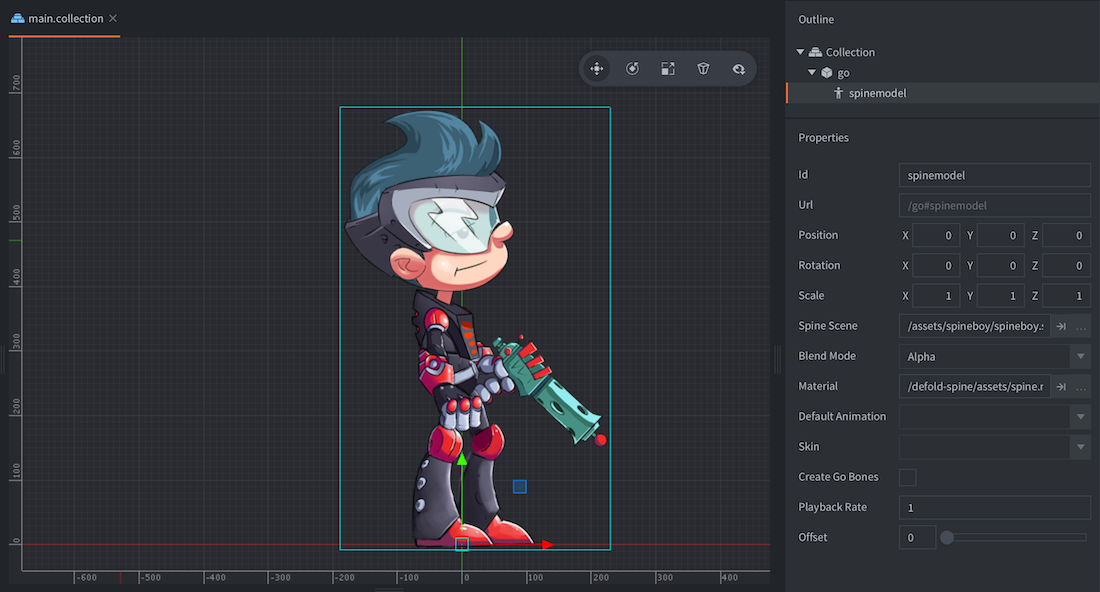
Spine model properties
Apart from the properties Id, Position and Rotation the following component specific properties exist:
- Spine scene
- Set this to the Spine scene file you created earlier.
- Blend Mode
- If you want a blend mode other than the default
Alpha, change this property. - Material
- If you need to render the model with a custom material, change this property.
- Default animation
- Set this to the animation you want the model to start with.
- Skin
- If your model has skins, select the one you want it to start with.
- Create Go Bones
- Check this to create bones that can be accessed at runtime.
- Playback Rate
- Set this to change the animation playback rate.
- Offset
- Set this to change how far into the animation to start. A value of 0 means that the animation will start from the beginning while a value of 0.5 will start the animation halfway from start to finish.
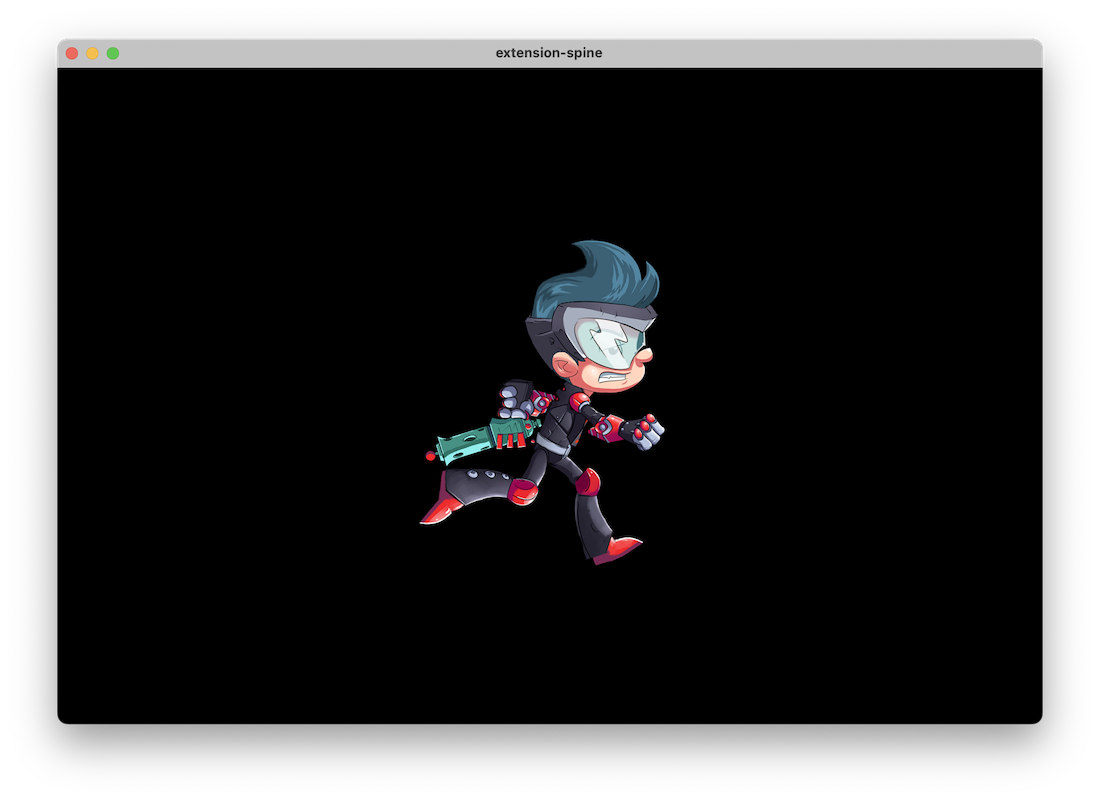
You should now be able to view your Spine model in the editor:
Blend modes
The Blend Mode property defines how the component graphics should be blended with the graphics behind it. These are the available blend modes and how they are calculated:
- Alpha
- Normal blending:
src.a * src.rgb + (1 - src.a) * dst.rgb - Add
- Brighten the background with the color values of the corresponding pixels of the component:
src.rgb + dst.rgb - Multiply
- Darken the background with values of the corresponding pixels of the component:
src.rgb * dst.rgb - Screen
- Opposite of Multiply. Brighten background and values of the corresponding pixels of the component:
src.rgb - dst.rgb * dst.rgb
Runtime manipulation
You can manipulate spine models in runtime through a number of different functions and properties (refer to the API docs for usage).
Changing properties
A spine model also has a number of different properties that can be manipulated using go.get() and go.set():
animation- The current model animation (
hash) (READ ONLY). You change animation usingspine.play_anim()(see Playing Animations). cursor- The normalized animation cursor (
number). material- The spine model material (
hash). You can change this using a material resource property andgo.set(). Refer to the API reference for an example. playback_rate- The animation playback rate (
number). skin- The current skin on the component (
hash).
Material constants
The default spine material has the following constants that can be changed using go.set() or go.animate() (refer to the Material manual for more details). Examples:
go.set("#spine", "tint", vmath.vector4(1,0,0,1))
go.animate("#spine", "tint", go.PLAYBACK_LOOP_PINGPONG, vmath.vector4(1,0,0,1), go.EASING_LINEAR, 2)
tint- The color tint of the spine model (
vector4). The vector4 is used to represent the tint with x, y, z, and w corresponding to the red, green, blue and alpha tint.
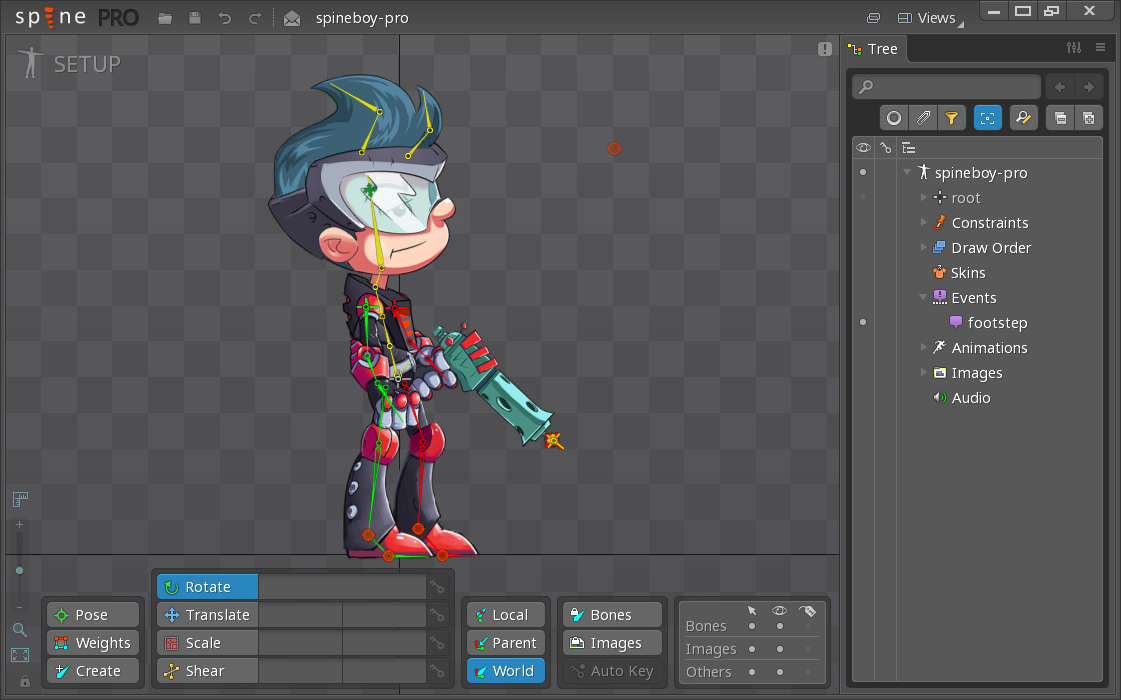
The bone hierarchy
The individual bones in the Spine skeleton are represented internally as game objects. In the Outline view of the Spine model component, the full hierarchy is visible. You can see each bone’s name and its place in the skeleton hierarchy.
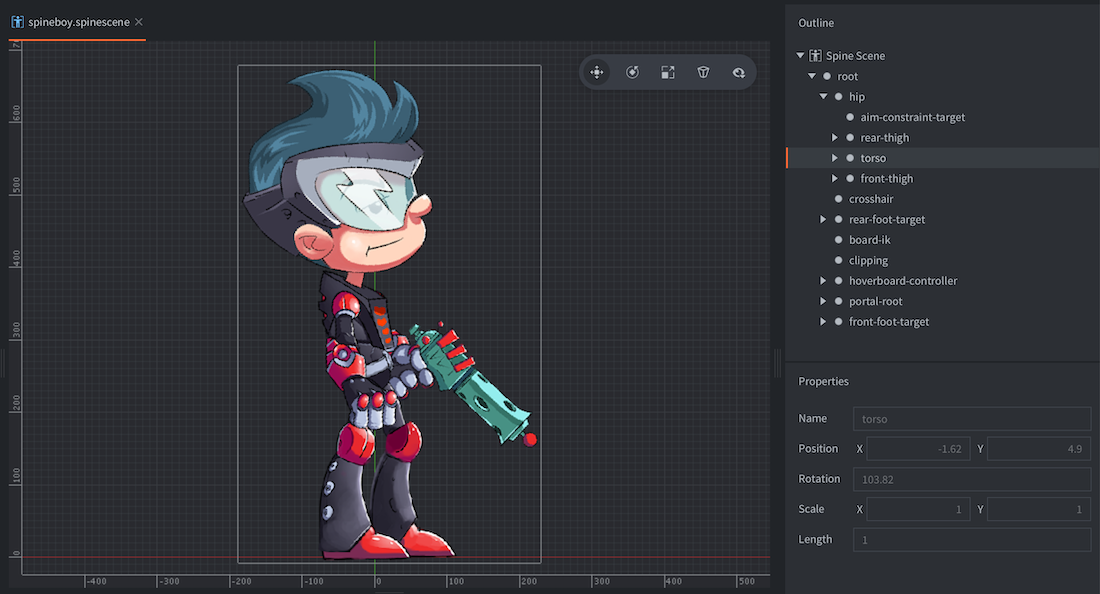
With the bone name at hand, you are able to retrieve the instance id of the bone in runtime. The function spine.get_go() returns the id of the specified bone and you can, for instance, child other game objects under the animated game object:
-- Attach pistol game object to the hand of the heroine
local hand = spine.get_go("heroine#spinemodel", "front_hand")
msg.post("pistol", "set_parent", { parent_id = hand })
Playing animations
To run animations on your model, simply call the spine.play_anim() function:
local function anim_done(self, message_id, message, sender)
    if message_id == hash("spine_animation_done") then
      -- the animation is done, do something useful...
    end
end

function init(self)
    -- Play the "walk" animation on component "spinemodel" and blend against previous
    -- animation for the first 0.1 seconds, then call callback.
    local anim_props = { blend_duration = 0.1 }
    spine.play_anim("#spinemodel", "run", go.PLAYBACK_LOOP_FORWARD, anim_props, anim_done)
end
The callback function will be called when the animation has played to the end. The function is never called for looping animations, nor when an animation is manually canceled via spine.cancel(). The callback can be used to trigger events on animation completion or to chain multiple animations together.
Cursor animation
In addition to using the spine.play_anim() to advance a spine animation, Spine Model components expose a “cursor” property that can be manipulated with go.animate() (more about property animations):
-- Set the animation on the spine model but don't run it.
spine.play_anim("#spinemodel", "run_right", go.PLAYBACK_NONE, anim_props, cb)

-- Set the cursor to position 0
go.set("#spinemodel", "cursor", 0)

-- Tween the cursor slowly between 0 and 1 pingpong with in-out quad easing.
go.animate("#spinemodel", "cursor", go.PLAYBACK_LOOP_PINGPONG, 1, go.EASING_INOUTQUAD, 6)
When tweening or setting the cursor, timeline events may not fire as expected.
Timeline events
Spine animations can trigger timed events at precise moments. They are very useful for events that should take place in sync with your animation, like playing footstep sounds, spawning particle effects, attaching or detaching objects to the bone hierarchy or anything else you would like to happen.
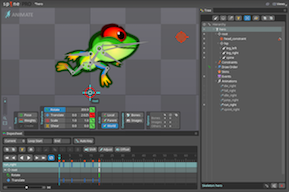
Events are added in the Spine software and are visualized on the playback timeline:
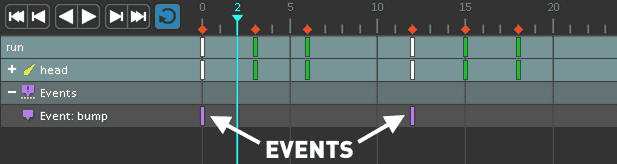
Each event is referenced with a name identifier (“bump” in the example above) and each event instance on the timeline can contain additional information:
- Integer
- A numerical value expressed as an integer.
- Float
- A floating point numerical value.
- String
- A string value.
When the animation plays and events are encountered, spine_event callbacks are sent back to the callback function provided with spine.play_anim(). The message data contains the custom numbers and strings embedded in the event, as well as a few additional fields that are sometimes useful:
t- The number of seconds passed since the first frame of the animation.
animation_id- The animation name, hashed.
string- The provided string value, hashed.
float- The provided floating point numerical value.
integer- The provided integer numerical value.
event_id- The event identifier, hashed.
local function anim_done(self, message_id, message, sender)
  if message_id == hash("spine_animation_done") then
    if message.animation_id == hash("jump") then
      -- open animation done, chain with "run"
      local properties = { blend_duration = 0.2 }
      spine.play_anim(sender, "run", go.PLAYBACK_LOOP_FORWARD, properties, anim_done)
    end
  elseif message_id == hash("spine_event") then
      pprint("spine event", message)
  end
end
function init(self)
    local url = msg.url("#spinemodel")
    local play_properties = { blend_duration = 0.1 }
    -- first blend during 0.1 sec into the jump, then during 0.2 s into the run animation
    spine.play_anim(url, "open", go.PLAYBACK_ONCE_FORWARD, play_properties, anim_done)
end
Playback Modes
Animations can be played either once or in a loop. How the animation plays is determined by the playback mode:
- go.PLAYBACK_NONE
- go.PLAYBACK_ONCE_FORWARD
- go.PLAYBACK_ONCE_BACKWARD
- go.PLAYBACK_ONCE_PINGPONG
- go.PLAYBACK_LOOP_FORWARD
- go.PLAYBACK_LOOP_BACKWARD
- go.PLAYBACK_LOOP_PINGPONG
The pingpong modes run the animation first forward, then backward.
Creating Spine GUI nodes
First you have to import the animation data and set up a Spine Scene resource (see above).
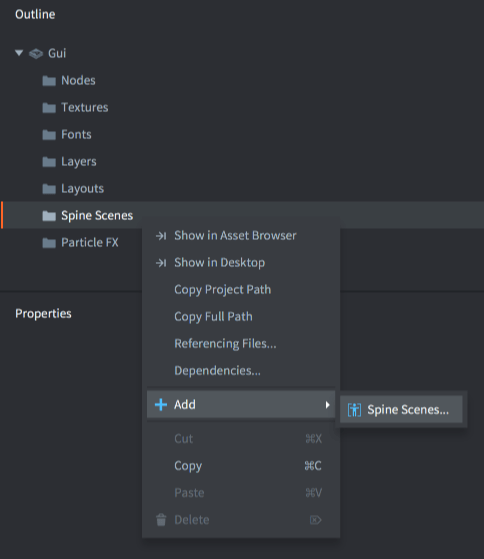
Second, the contents of your Spine Scene resource must be available in your GUI scene. Add it by right-clicking the Spine Scenes section of the scene in the Outline and select Add ▸ Spine Scenes.... Choose the Spine Scenes (one or more) you wish to use in the scene.
Third, create a Spine node by right clicking the Nodes section of the Outline and selecting Add ▸ Spine).
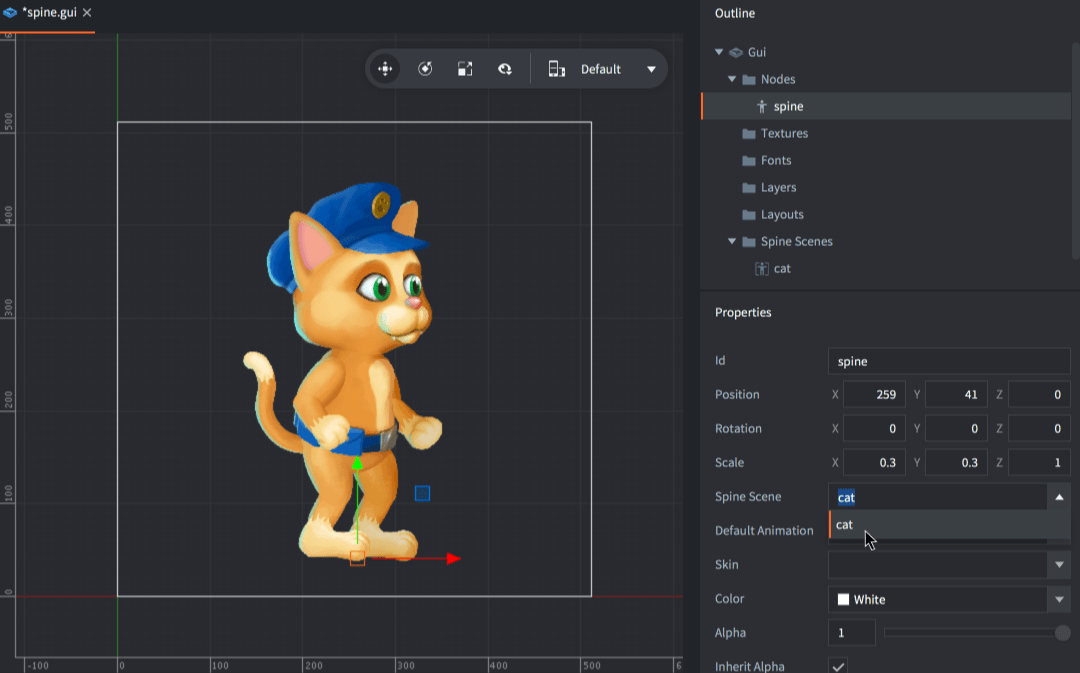
The new node is automatically selected. Make sure to set its properties:
- Spine Scene
- The Spine Scene to use as a data source for this node.
- Spine Default Animation
- The animation to automatically start playing when the scene is initialized.
- Skin
- The skin to use for the animation when the scene is initialized.
Runtime animation control
Spine nodes can be controlled in runtime through script. To start an animation on a node, simply call the gui.play_spine_anim() function:
local catnode = gui.get_node("cat_note")
local play_properties = { blend_time = 0.3, offset = 0, playback_rate = 1 }
gui.play_spine_anim(catnode, hash("run"), gui.PLAYBACK_ONCE_FORWARD, play_properties, function(self, node)
    print("Animation done!")
end)
Use one of the following playback modes to control animation playback:
- gui.PLAYBACK_NONE
- gui.PLAYBACK_ONCE_FORWARD
- gui.PLAYBACK_ONCE_BACKWARD
- gui.PLAYBACK_ONCE_PINGPONG
- gui.PLAYBACK_LOOP_FORWARD
- gui.PLAYBACK_LOOP_BACKWARD
- gui.PLAYBACK_LOOP_PINGPONG
GUI node bone hierarchy
The individual bones in the Spine skeleton can be accessed as GUI nodes. The nodes are named according to their names in the Spine setup.

For instance, to attach another node to an existing bone node, fetch the bone node by name with gui.get_spine_bone() and attach the child to it:
-- Attach a text node to the tail of the cat
local cat = gui.get_node("cat_node")
local textnode = gui.new_text_node(vmath.vector3(400, 0, 0), "Hello tail!")
local tail = gui.get_spine_bone(cat, "tail")
gui.set_parent(textnode, tail)
Bones are also accessible through gui.get_node(), by the bone name prefixed by the name of the name of the Spine node and a slash (/):
-- Attach a text node to the tail of the cat
local textnode = gui.new_text_node(vmath.vector3(400, 0, 0), "Hello tail!")
local tail = gui.get_node("cat_node/tail")
gui.set_parent(textnode, tail)
Atlas caveats
The animation data references the images used for the bones by name with the file suffix stripped off. You add images to your Spine project in the Spine software and they are listed in the hierarchy under Images:

This example shows files laid out in a flat structure. It is, however, possible to organize the files in subfolders and the file references will reflect that. For instance, a file head_parts/eyes.png on disk will be referenced as head_parts/eyes when you use it in a slot. This is also the name used in the exported JSON file so when creating the Defold image atlas, all names must match an atlas animation.
If you select Add Images Defold will automatically create animation groups with the same name as the added files, but with the file suffix stripped off. So, after having added the file eyes.png its animation group can be referenced by the name “eyes”. This works with file names only, not paths.
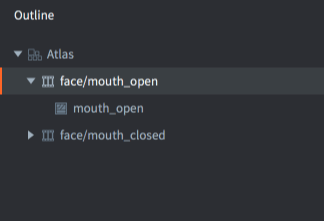
So what do you do if your animation references “head_parts/eyes”? The easiest way to accomplish a match is to add an animation group (right click the root node in the Atlas Outline view and select Add Animation Group). You can then name that group “head_parts/eyes” (it’s just a name, not a path and / characters are legal) and then add the file “eyes.png” to the group.
- English
- 中文 (Chinese)
- Español (Spanish)
- Français (French)
- Νεοελληνική γλώσσα (Greek)
- Italiano (Italian)
- Język polski (Polish)
- Português (Portuguese)
- Русский (Russian)
- Українська (Ukranian)
Did you spot an error or do you have a suggestion? Please let us know on GitHub!
GITHUB