Sprites
A Sprite component is a simple image or flipbook animation that is displayed on screen.
![]()
The Sprite component can use either an Atlas or a Tile Source for it’s graphics.
Sprite properties
Apart from the properties Id, Position and Rotation the following component specific properties exist:
- Image
- If the shader has a single sampler, this field is named
Image. Otherwise, each slot is named after the texture sampler in the material. Each slot specifies the atlas or tilesource resource to use for the sprite on that texture sampler. - Default Animation
- The animation to use for the sprite. The animation information is taken from the first atlas or tilesource.
- Material
- The material to use for rendering the sprite.
- Blend Mode
- The blend mode to use when rendering the sprite.
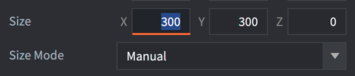
- Size Mode
- If set to
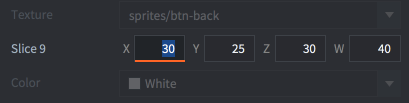
Automaticthe editor will set a size of the sprite. If set toManualyou can set the size yourself. - Slice 9
- Set to preserve the pixel size of the sprite’s texture around the edges when the sprite is resized.
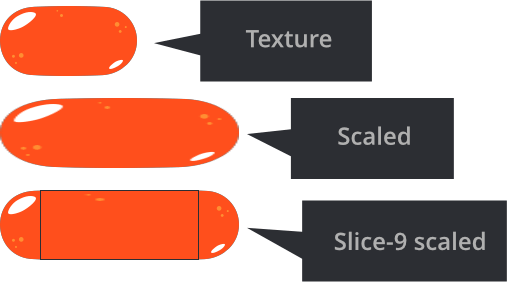
Slice-9 texturing
GUI box nodes and Sprite components sometimes feature elements that are context sensitive in regard to their size: panels and dialogs that need to be resized to fit the containing content or a health bar that need to be resized to show the remaining health of an enemy. These may cause visual problems when you apply texturing to the resized node or sprite.
Normally, the engine scales the texture to fit the rectangular boundaries, but by defining slice-9 edge areas it is possible to limit what parts of the texture that should scale:
The Slice9 box node consists of 4 numbers that specify the number of pixels for the left, top, right and bottom margin that should not be regularly scaled:
The margins are set clockwise, starting on the left edge:
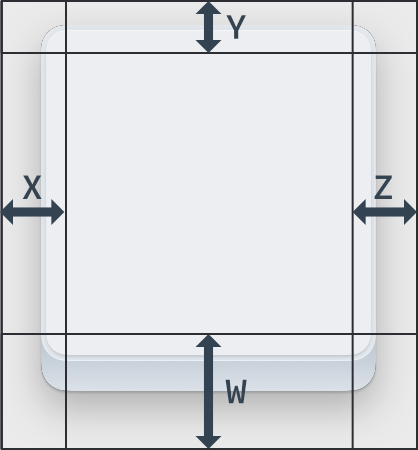
- Corner segments are never scaled.
- Edge segments are scaled along a single axis. The left and right edge segments are scaled vertically. The top and bottom edge segments are scaled horizontally.
- The central texture area is scaled horizontally and vertically as needed.
The Slice9 texture scaling described above is only applied when you change box node’s or sprite’s size:
![]()
If you change scale parameter of the box node or sprite (or on the game object) - the node or sprite and texture is scaled without applying Slice9 parameters.
When using slice-9 texturing on Sprites the Sprite Trim Mode of the image must be set to Off.
Mipmaps and slice-9
Due to the way mipmapping works in the renderer, scaling of texture segments can sometimes exhibit artifacts. This happens when you scale down segments below the original texture size. The renderer then selects a lower resolution mipmap for the segment, resulting in visual artifacts.
To avoid this problem, make sure that the texture’s segments that will be scaled are small enough never to be scaled down, only up.
Blend modes
The Blend Mode property defines how the component graphics should be blended with the graphics behind it. These are the available blend modes and how they are calculated:
- Alpha
- Normal blending:
src.a * src.rgb + (1 - src.a) * dst.rgb - Add
- Brighten the background with the color values of the corresponding pixels of the component:
src.rgb + dst.rgb - Multiply
- Darken the background with values of the corresponding pixels of the component:
src.rgb * dst.rgb - Screen
- Opposite of Multiply. Brighten background and values of the corresponding pixels of the component:
src.rgb - dst.rgb * dst.rgb
Runtime manipulation
You can manipulate sprites in runtime through a number of different functions and properties (refer to the API docs for usage). Functions:
sprite.play_flipbook()- Play an animation on a sprite component.sprite.set_hflip()andsprite.set_vflip()- Set horizontal and vertical flipping on a sprite’s animation.
A sprite also has a number of different properties that can be manipulated using go.get() and go.set():
cursor- The normalized animation cursor (
number). image- The sprite image (
hash). You can change this using an atlas or tile source resource property andgo.set(). Refer to the API reference for an example. material- The sprite material (
hash). You can change this using a material resource property andgo.set(). Refer to the API reference for an example. playback_rate- The animation playback rate (
number). scale- The non-uniform scale of the sprite (
vector3). size- The size of the sprite (
vector3). Can only be changed if sprite size-mode is set to manual.
Material constants
The default sprite material has the following constants that can be changed using go.set() or go.animate() (refer to the Material manual for more details). Examples:
go.set("#sprite", "tint", vmath.vector4(1,0,0,1))
go.animate("#sprite", "tint", go.PLAYBACK_LOOP_PINGPONG, vmath.vector4(1,0,0,1), go.EASING_LINEAR, 2)
tint- The color tint of the sprite (
vector4). The vector4 is used to represent the tint with x, y, z, and w corresponding to the red, green, blue and alpha tint.
Material attributes
A sprite can override vertex attributes from the currently assigned material and will be passed into the vertex shader from the component (refer to the Material manual for more details).
The attributes specified in the material will show up as regular properties in the inspector and can be set on individual sprite components. If any of the attributes are overridden, it will show up as an overridden property and stored in the sprite file on disk:
![]()
Project configuration
The game.project file has a few project settings related to sprites.
Multi textured sprites
When a sprite uses multiple textures there are some things to note.
Animations
The animation data (fps, frame names) is currently taken from the first texture. We’ll call this the “driving animation”.
The image id’s of the driving animation are used to lookup the images in another texture. So it’s important to make sure the frame ids match between textures.
E.g. if your diffuse.atlas has a run animation like so:
run:
    /main/images/hero_run_color_1.png
    /main/images/hero_run_color_2.png
    ...
Then the frame id’s would be run/hero_run_color_1 which is not likely to be found in for instance a normal.atlas:
run:
    /main/images/hero_run_normal_1.png
    /main/images/hero_run_normal_2.png
    ...
So we use the Rename patterns in the atlas to rename them.
Set _color= and _normal= in the corresponding atlases, and you’ll get frame names like this in both atlases:
run/hero_run_1
run/hero_run_2
...
UVs
The UVs are taken from the first texture. Since there is only one set of vertices, we cannot guarantee a good match anyways if the secondary textures have either more UV coordinates or a different shape.
This is important to note, so make sure the images have similar enough shapes, or you might experience texture bleeding.
The dimensions of the images in each texture may be different.
- Sprites
- Sprite properties
- Blend modes
- Runtime manipulation
- Material constants
- Material attributes
- Project configuration
- Multi textured sprites
- Animations
- UVs
- English
- 中文 (Chinese)
- Español (Spanish)
- Français (French)
- Νεοελληνική γλώσσα (Greek)
- Italiano (Italian)
- Język polski (Polish)
- Português (Portuguese)
- Русский (Russian)
- Українська (Ukranian)
Did you spot an error or do you have a suggestion? Please let us know on GitHub!
GITHUB