

This translation is community contributed and may not be up to date. We only maintain the English version of the documentation. Read this manual in English
カメラ
Defold のカメラ(camera)は、ゲームワールド(game world)のビューポート(viewport)と投影を変更するコンポーネント(component)です。カメラコンポーネントは、透視投影(perspective projection)または正投影(orthographic projection)に対応する最小限のカメラを定義し、レンダースクリプト(render script)にビュー行列(view matrix)と投影行列(projection matrix)を渡します。
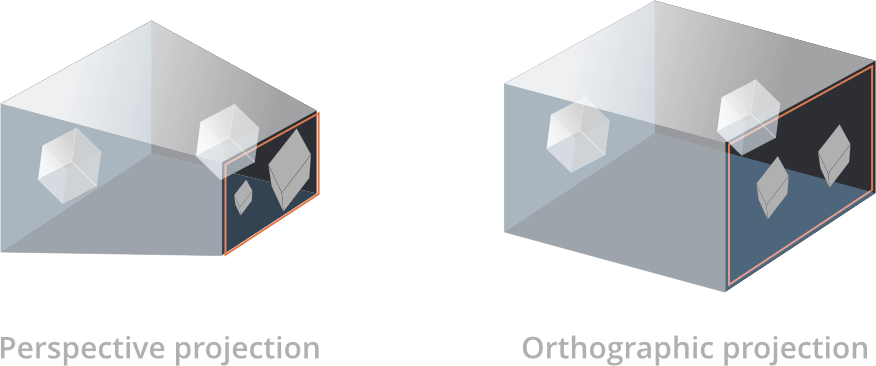
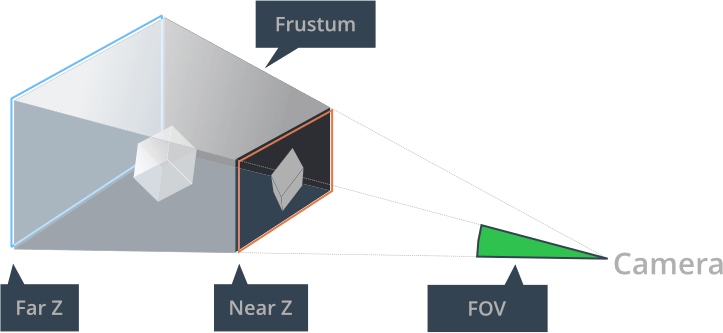
透視投影カメラは一般的に 3D ゲームに使われます。この場合、カメラからの見え方やオブジェクトの大きさと遠近感は、視錐台(view frustum)と、カメラからゲーム内のオブジェクトまでの距離および視線の角度に基づきます。
2D ゲームでは、多くの場合、シーンを正投影でレンダリングするのが望ましいです。この場合、カメラの表示範囲は視錐台ではなくボックスで決まります。正投影は、距離によってオブジェクトの大きさが変わらないという点で、現実の見え方とは異なります。1000単位離れたオブジェクトも、カメラのすぐ前にあるオブジェクトと同じ大きさで描画されます。
カメラの作成
カメラを作成するには、ゲームオブジェクト(game object)を 右クリック し、Add Component ▸ Camera を選択します。または、プロジェクト階層内にコンポーネントファイルを作成し、そのファイルをゲームオブジェクトに追加することもできます。
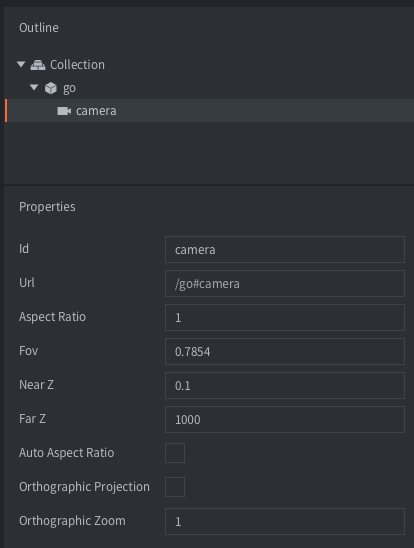
カメラコンポーネントには、カメラの 視錐台 を定義する次のプロパティ(property)があります。
- Id
- コンポーネントの ID です。
- Aspect Ratio
- (透視投影カメラのみ) - 視錐台の幅と高さの比率です。1.0 は正方形の表示範囲を想定していることを意味します。1.33 は 1024x768 などの 4:3 の表示に適し、1.78 は 16:9 の表示に適しています。Auto Aspect Ratio が設定されている場合、この設定は無視されます。
- Fov
- (透視投影カメラのみ) - カメラの 垂直方向 の視野角(FOV)を ラジアン 単位で表したものです。視野角が広いほど、カメラに映る範囲が広くなります。
- Near Z
- ニアクリップ面の Z 値です。
- Far Z
- ファークリップ面の Z 値です。
- Auto Aspect Ratio
- (透視投影カメラのみ) - カメラでアスペクト比を自動計算するには、これを設定します。
- Orthographic Projection
- カメラを正投影に切り替えるには、これを設定します(下記参照)。
- Orthographic Zoom
- (正投影カメラのみ) - ユーザーが制御するズーム倍率です(> 1 = ズームイン、< 1 = ズームアウト)。
Fixedモードでは、これが実際のズーム倍率になります。Auto FitおよびAuto Coverモードでは、自動計算されたズーム倍率にこの値を掛けます。これにより、自動サイズ調整を無効にせずに、さらにズームを加えることができます。 - Orthographic Mode
- (正投影カメラのみ) - ウィンドウサイズと設計解像度(
game.project→display.width/heightの値)に応じて、正投影カメラがズーム倍率を決定する方法を制御します。Fixed(固定のズーム倍率を使用): 現在のOrthographic Zoomの値をそのまま使います。Auto Fit(全体を収める): 設計領域全体がウィンドウ内に収まるようにズーム倍率を自動計算し、その値にOrthographic Zoomを掛けます。左右または上下に追加のコンテンツが表示されることがあります。Auto Cover(全体を覆う): 設計領域がウィンドウ全体を覆うようにズーム倍率を自動計算し、その値にOrthographic Zoomを掛けます。左右または上下が切り取られることがあります。Orthographic Projectionが有効な場合にのみ使用できます。
カメラの使用
すべてのカメラは、フレーム中に自動的に有効化され、更新されます。Lua の camera モジュールは、すべてのスクリプトコンテキストで使用できます。Defold 1.8.1 以降では、カメラコンポーネントに acquire_camera_focus メッセージを送信してカメラを明示的に有効化する必要はなくなりました。従来の取得と解放のメッセージも引き続き使用できますが、ほかのコンポーネントを有効化または無効化するときと同じように、代わりに enable と disable メッセージを使うことをお勧めします。
msg.post("#camera", "disable")
msg.post("#camera", "enable")
現在使用可能なすべてのカメラを列挙するには、camera.get_cameras() を使います。
-- Note: The render calls are only available in a render script.
--       The camera.get_cameras() function can be used anywhere,
--       but render.set_camera can only be used in a render script.

for k,v in pairs(camera.get_cameras()) do
    -- the camera table contains the URLs of all cameras
    render.set_camera(v)
    -- do rendering here - anything rendered here that uses materials with
    -- view and projection matrices specified, will use matrices from the camera.
end
-- to disable a camera, pass in nil (or no arguments at all) to render.set_camera.
-- after this call, all render calls will use the view and projection matrices
-- that are specified on the render context (render.set_view and render.set_projection)
render.set_camera()
スクリプト用の camera モジュールには、カメラの操作に使える関数が複数あります。以下にその一部を示します。使用可能なすべての関数については、API ドキュメント) を参照してください。
camera.get_aspect_ratio(camera) -- get aspect ratio
camera.get_far_z(camera) -- get far z
camera.get_fov(camera) -- get field of view
camera.get_orthographic_mode(camera) -- get orthographic mode (one of camera.ORTHO_MODE_*)
camera.get_orthographic_zoom(camera) -- get the user-controlled zoom multiplier
camera.get_orthographic_auto_zoom(camera) -- get the automatically calculated zoom
camera.set_aspect_ratio(camera, ratio) -- set aspect ratio
camera.set_far_z(camera, far_z) -- set far z
camera.set_near_z(camera, near_z) -- set near z
camera.set_orthographic_mode(camera, camera.ORTHO_MODE_AUTO_FIT) -- set orthographic mode
... And so forth
カメラは URL で識別します。URL は、コレクション(collection)、所属するゲームオブジェクト、コンポーネント ID を含む、コンポーネントの完全なシーンパスです。この例では、同じコレクション内からカメラコンポーネントを識別する場合は URL /go#camera を使い、別のコレクションまたはレンダースクリプトからカメラにアクセスする場合は main:/go#camera を使います。
-- Accessing a camera from a script in the same collection:
camera.get_fov("/go#camera")

-- Accessing a camera from a script in a different collection:
camera.get_fov("main:/go#camera")

-- Accessing a camera from the render script:
render.set_camera("main:/go#camera")
各フレームで、現在カメラフォーカスを持つカメラコンポーネントが、@render ソケットに set_view_projection メッセージを送信します。
-- builtins/render/default.render_script
--
function on_message(self, message_id, message)
    if message_id == hash("set_view_projection") then
        self.view = message.view                    -- [1]
        self.projection = message.projection
    end
end
- カメラコンポーネントから送信されるメッセージには、ビュー行列と投影行列が含まれます。
カメラコンポーネントは、カメラの Orthographic Projection プロパティに応じて、透視投影または正投影の投影行列をレンダースクリプトに渡します。投影行列には、カメラに定義されたニアクリップ面とファークリップ面、視野角、アスペクト比の設定も反映されます。
カメラが渡すビュー行列は、カメラの位置と向きを定義します。Orthographic Projection のカメラは、取り付け先のゲームオブジェクトの位置が表示範囲の中心になります。一方、Perspective Projection のカメラは、取り付け先のゲームオブジェクトの位置が表示範囲の左下隅になります。
レンダースクリプト
デフォルトのレンダースクリプトを使う場合、Defold は最後に有効化されたカメラをレンダリングに使うカメラとして自動的に設定します。この変更以前は、プロジェクト内のいずれかのスクリプトからレンダラーに use_camera_projection メッセージを明示的に送信して、カメラコンポーネントのビュー行列と投影行列を使うことを通知する必要がありました。現在は不要ですが、後方互換性のために引き続き送信できます。
また、レンダースクリプト内で、レンダリングに使う特定のカメラを設定することもできます。たとえばマルチプレイヤーゲームなど、レンダリングに使うカメラをより細かく制御する必要がある場合に役立ちます。
-- render.set_camera will automatically use the view and projection matrices
-- for any rendering happening until render.set_camera() is called.
render.set_camera("main:/my_go#camera")
カメラがアクティブかどうかを確認するには、カメラ API の get_enabled 関数を使います。
if camera.get_enabled("main:/my_go#camera") then
    -- camera is enabled, use it for rendering!
    render.set_camera("main:/my_go#camera")
end
set_camera 関数と視錐台カリング(frustum culling)を組み合わせて使うには、次のオプションを関数に渡す必要があります。
render.set_camera("main:/my_go#camera", {use_frustum = true})
カメラのパン
カメラコンポーネントを取り付けたゲームオブジェクトを移動すると、ゲームワールド内でカメラをパンしたり移動したりできます。カメラコンポーネントは、カメラの現在の x 軸と y 軸の位置に基づいて更新されたビュー行列を自動的に送信します。
カメラのズーム
透視投影カメラでは、カメラを取り付けたゲームオブジェクトを z 軸に沿って移動すると、ズームインとズームアウトができます。カメラコンポーネントは、カメラの現在の z 位置に基づいて更新されたビュー行列を自動的に送信します。
正投影カメラでは、エディターまたは実行時にカメラの Orthographic Zoom プロパティを変更すると、ズームインとズームアウトができます。
-- In Fixed mode, this is the effective zoom.
go.set("#camera", "orthographic_zoom", 2)
Auto Fit および Auto Cover モードでは、Orthographic Zoom は自動計算されたズーム倍率に追加で適用され、無視されることはありません。たとえば、エディターで Orthographic Mode を Auto Fit、Orthographic Zoom を 1.25 に設定すると、設計領域がウィンドウに収まるように調整されてから、さらに 25% ズームインします。実行時に同じ設定を行うコードは次のとおりです。
camera.set_orthographic_mode("#camera", camera.ORTHO_MODE_AUTO_FIT)
go.set("#camera", "orthographic_zoom", 1.25)

local auto_zoom = camera.get_orthographic_auto_zoom("#camera")
local zoom_multiplier = camera.get_orthographic_zoom("#camera")
local effective_zoom = auto_zoom * zoom_multiplier
camera.get_orthographic_auto_zoom() は、Auto Fit および Auto Cover モードでは、現在のウィンドウとプロジェクトの寸法から計算されたズーム倍率を返します。Fixed モードでは 1.0 を返します。同じ値は、読み取り専用のコンポーネントプロパティ orthographic_auto_zoom からも取得できます。
local auto_zoom = go.get("#camera", "orthographic_auto_zoom")
正投影カメラでは、Orthographic Mode 設定またはスクリプトを使って、ズーム倍率の決定方法を切り替えることもできます。
-- get current mode (one of camera.ORTHO_MODE_FIXED, _AUTO_FIT, _AUTO_COVER)
local mode = camera.get_orthographic_mode("#camera")

-- switch to auto-fit (contain) to always keep the full design area visible
camera.set_orthographic_mode("#camera", camera.ORTHO_MODE_AUTO_FIT)

-- switch to auto-cover to ensure the design area covers the window
camera.set_orthographic_mode("#camera", camera.ORTHO_MODE_AUTO_COVER)

-- switch to fixed mode to use orthographic_zoom without automatic sizing
camera.set_orthographic_mode("#camera", camera.ORTHO_MODE_FIXED)
適応型ズーム
適応型ズーム(adaptive zoom)は、ディスプレイの解像度が game.project に設定された初期解像度から変わったときに、カメラのズーム値を調整するという考え方です。
適応型ズームには、一般的に次の2つの方法があります。
- 最大ズーム - game.project の初期解像度に含まれるコンテンツが画面全体を埋め、画面の境界を越えて広がるようにズーム値を計算します。左右または上下のコンテンツが一部隠れることがあります。
- 最小ズーム - game.project の初期解像度に含まれるコンテンツが画面内に完全に収まるようにズーム値を計算します。左右または上下に追加のコンテンツが表示されることがあります。
例:
local DISPLAY_WIDTH = sys.get_config_int("display.width")
local DISPLAY_HEIGHT = sys.get_config_int("display.height")

function init(self)
    local initial_zoom = go.get("#camera", "orthographic_zoom")
    local display_scale = window.get_display_scale()
    window.set_listener(function(self, event, data)
        if event == window.WINDOW_EVENT_RESIZED then
            local window_width = data.width
            local window_height = data.height
            local design_width = DISPLAY_WIDTH / initial_zoom
            local design_height = DISPLAY_HEIGHT / initial_zoom

            -- max zoom: ensure that the initial design dimensions will fill and expand beyond the screen bounds
            local zoom = math.max(window_width / design_width, window_height / design_height) / display_scale

            -- min zoom: ensure that the initial design dimensions will shrink and be contained within the screen bounds
            --local zoom = math.min(window_width / design_width, window_height / design_height) / display_scale

            go.set("#camera", "orthographic_zoom", zoom)
        end
    end)
end
適応型ズームの完全な例は、このサンプルプロジェクト で確認できます。
注: 正投影カメラでは、Orthographic Mode を Auto Fit(全体を収める)または Auto Cover(全体を覆う)に設定すると、カスタムコードなしでそれぞれの動作を実現できるようになりました。これらのモードでは、ウィンドウサイズと設計解像度から計算されたズーム倍率に Orthographic Zoom を掛けます。
ゲームオブジェクトの追従
カメラコンポーネントを取り付けたゲームオブジェクトを、追従対象のゲームオブジェクトの子に設定すると、カメラをそのゲームオブジェクトに追従させることができます。
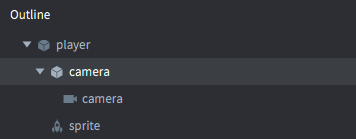
別の方法として、追従対象のゲームオブジェクトの移動に合わせて、カメラコンポーネントを取り付けたゲームオブジェクトの位置を毎フレーム更新することもできます。
スクリーン座標とワールド座標の相互変換
カメラをパンまたはズームしたり、投影方式を変更したりすると、入力座標とワールド座標はそのままでは一致しなくなります。action.screen_x と action.screen_y をカメラの座標変換関数に渡して使います。省略可能なカメラ URL を指定しなかった場合は、最後に有効化されたカメラが使われます。
正投影カメラでは、camera.screen_xy_to_world() は、スクリーン上のピクセルに対応するカメラのニアクリップ面上の点を、ワールド空間で返します。
function on_input(self, action_id, action)
    if action_id == hash("touch") and action.pressed then
        local world_position = camera.screen_xy_to_world(
            action.screen_x, action.screen_y, "#camera")
        go.set_position(world_position, "/marker")
    end
end
透視投影カメラでは、camera.screen_to_world() は、Z 成分がカメラの平面から測ったワールド単位のビュー深度を表す vector3 を受け取ります。
local depth = 10
local world_position = camera.screen_to_world(
    vmath.vector3(action.screen_x, action.screen_y, depth), "#camera")
camera.world_to_screen() は逆方向の変換を行います。スクリーン上のピクセル座標 X と Y、および同じ定義のビュー深度を Z に返すため、その結果を camera.screen_to_world() に渡して元に戻すことができます。
-- Update the cached world transform first if the object moved this frame.
go.update_world_transform("/marker")
local world_position = go.get_world_position("/marker")
local screen_position = camera.world_to_screen(world_position, "#camera")
サンプルページ で、座標変換が実際に動作する様子を確認できます。同じ API の使用例を示すサンプルプロジェクトもあります。
このマニュアルで紹介しているサードパーティー製のカメラソリューション には、スクリーン座標との相互変換を行う関数があります。
実行時の操作
各種のメッセージとプロパティを通じて、実行時にカメラを操作できます(使い方は API ドキュメント を参照してください)。
カメラには、go.get() と go.set() を使って操作できるさまざまなプロパティがあります。
fov- カメラの視野角です (
number)。 near_z- カメラのニアクリップ面の Z 値です (
number)。 far_z- カメラのファークリップ面の Z 値です (
number)。 orthographic_zoom- ユーザーが制御する正投影カメラのズーム倍率です。
Auto FitおよびAuto Coverモードでは、orthographic_auto_zoomにこの値を掛けます。(number)。 orthographic_auto_zoomAuto FitおよびAuto Coverモードでは計算された正投影のズーム倍率で、Fixedモードでは1.0です。読み取り専用です。(number)。aspect_ratio- 視錐台の幅と高さの比率です。透視投影カメラの投影を計算するときに使います。(
number)。 view- 計算されたカメラのビュー行列です。読み取り専用です。(
matrix4)。 projection- 計算されたカメラの投影行列です。読み取り専用です。(
matrix4)。
サードパーティー製のカメラソリューション
コミュニティーが作成したカメラソリューションには、画面の揺れ、ゲームオブジェクトの追従、スクリーン座標からワールド座標への変換など、多くの一般的な機能が実装されています。これらは Defold のアセットポータルからダウンロードできます。
- 正投影カメラ(Orthographic camera)(2D のみ)。作者: Björn Ritzl。
- Defold Rendy(2D および 3D)。作者: Klayton Kowalski。