

This translation is community contributed and may not be up to date. We only maintain the English version of the documentation. Read this manual in English
GUI スクリプト
GUI のロジックを制御し、ノード(node)をアニメーションさせるには、Lua スクリプトを使います。GUI スクリプト(GUI script)は通常のゲームオブジェクト(game object)のスクリプトと同じように動作しますが、異なるファイル形式で保存され、利用できる関数も異なります。GUI スクリプトでは gui モジュールの関数を利用できます。
GUI へのスクリプトの追加
GUI にスクリプトを追加するには、まず Assets ブラウザー内の場所を 右クリック し、表示されたコンテキストメニューから New ▸ Gui Script を選択して GUI スクリプトファイルを作成します。
エディターは新しいスクリプトファイルを自動的に開きます。このファイルはテンプレートを基に作成され、ゲームオブジェクトのスクリプトと同じように、空のライフサイクル関数が用意されています。
function init(self)
   -- Add initialization code here
   -- Remove this function if not needed
end

function final(self)
   -- Add finalization code here
   -- Remove this function if not needed
end

function update(self, dt)
   -- Add update code here
   -- Remove this function if not needed
end

function on_message(self, message_id, message, sender)
   -- Add message-handling code here
   -- Remove this function if not needed
end

function on_input(self, action_id, action)
   -- Add input-handling code here
   -- Remove this function if not needed
end

function on_reload(self)
   -- Add input-handling code here
   -- Remove this function if not needed
end
GUI コンポーネント(GUI component)にスクリプトを関連付けるには、そのプロトタイプ(prototype)のファイル(他のエンジンでは「プレハブ(prefabs)」や「設計図(blueprints)」とも呼ばれます)を開き、Outline でルートを選択して GUI の Properties を表示します。Script プロパティにスクリプトファイルを設定します。
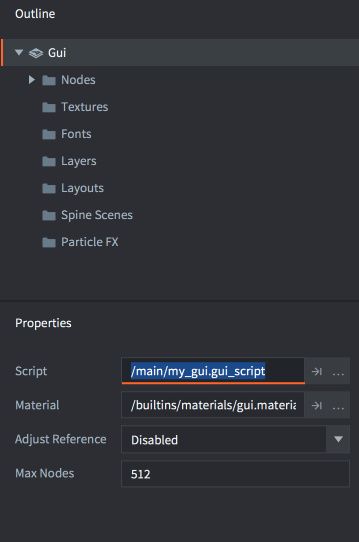
GUI コンポーネントがゲーム内のいずれかのゲームオブジェクトに追加されていれば、これでスクリプトが実行されます。
「gui」名前空間
GUI スクリプトは gui 名前空間と gui のすべての関数を利用できます。go 名前空間は利用できないため、ゲームオブジェクトのロジックをスクリプトコンポーネント(script component)に分離し、GUI スクリプトとゲームオブジェクトのスクリプトの間で通信する必要があります。go の関数を使おうとすると、エラーが発生します。
function init(self)
   local id = go.get_id()
end
ERROR:SCRIPT: /main/my_gui.gui_script:2: You can only access go.* functions and values from a script instance (.script file)
stack traceback:
   [C]: in function 'get_id'
   /main/my_gui.gui_script:2: in function </main/my_gui.gui_script:1>
メッセージパッシング
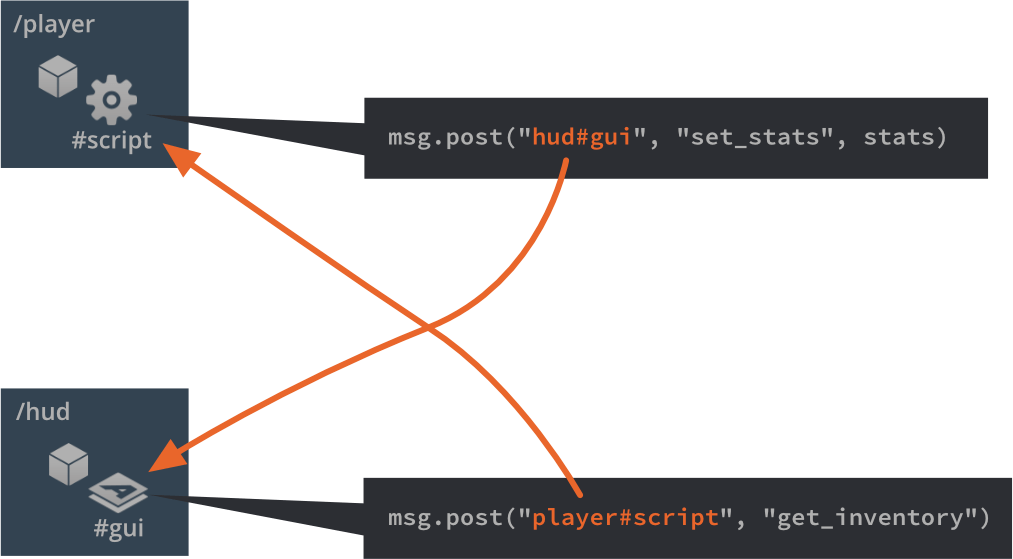
スクリプトが関連付けられている GUI コンポーネントは、メッセージによる通信であるメッセージパッシング(message passing)を通じて、ゲームのランタイム環境内の他のオブジェクトと通信できます。他のスクリプトコンポーネントと同じように動作します。
GUI コンポーネントのアドレスは、他のスクリプトコンポーネントと同じように指定します。
local stats = { score = 4711, stars = 3, health = 6 }
msg.post("hud#gui", "set_stats", stats)
ノードのアドレス指定
GUI ノードは、そのコンポーネントに関連付けられた GUI スクリプトから操作できます。各ノードには、エディターで設定する一意の Id が必要です。
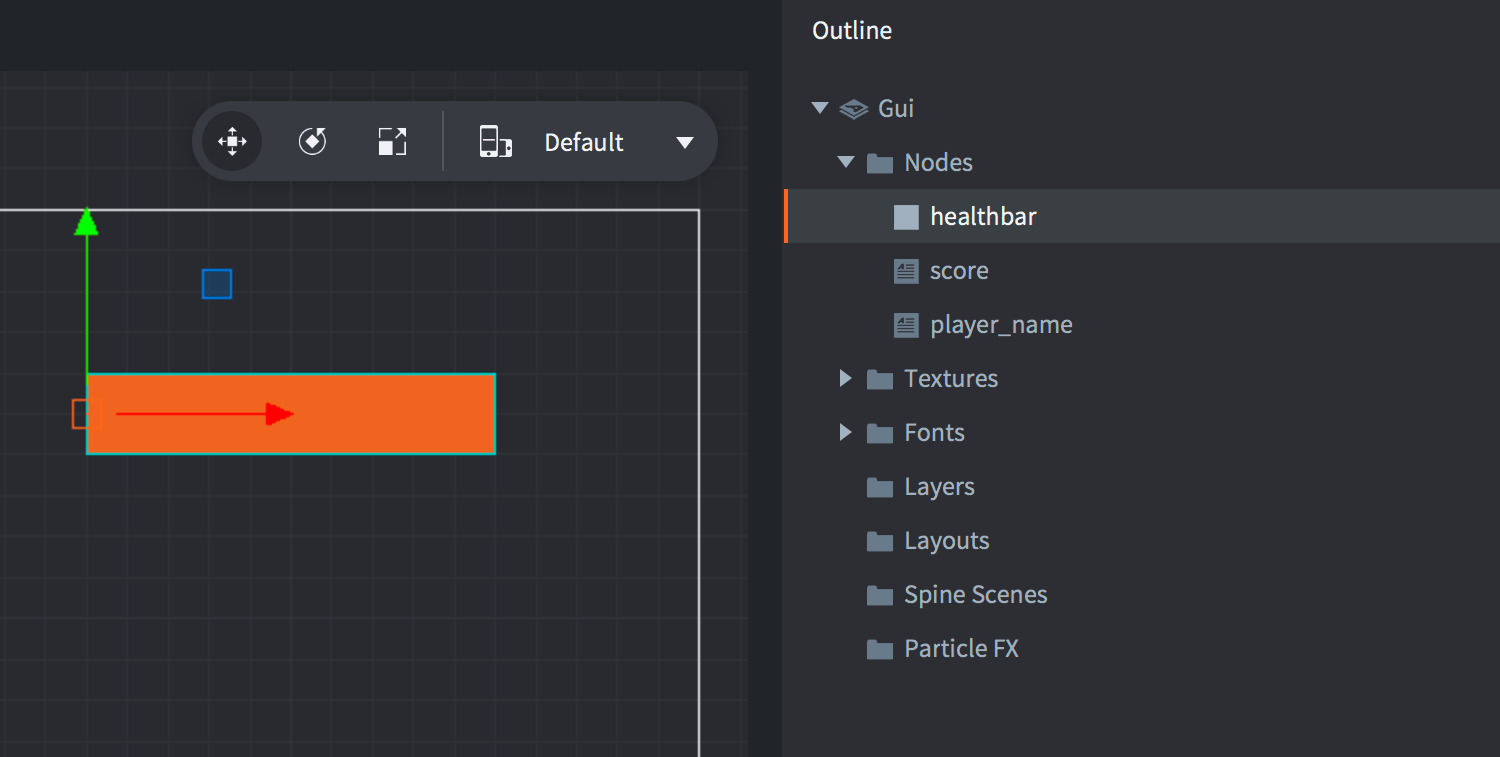
Id を使うと、スクリプトでノードへの参照を取得し、gui 名前空間の関数で操作できます。
-- extend the health bar by 10 units
local healthbar_node = gui.get_node("healthbar")
local size = gui.get_size(healthbar_node)
size.x = size.x + 10
gui.set_size(healthbar_node, size)
動的に作成されるノード
実行時にスクリプトで新しいノードを作成する方法は2つあります。1つ目は、gui.new_[type]_node() 関数を呼び出して、ノードを一から作成する方法です。これらの関数は新しいノードへの参照を返し、その参照を使ってノードを操作できます。
-- Create a new box node
local new_position = vmath.vector3(400, 300, 0)
local new_size = vmath.vector3(450, 400, 0)
local new_boxnode = gui.new_box_node(new_position, new_size)
gui.set_color(new_boxnode, vmath.vector4(0.2, 0.26, 0.32, 1))

-- Create a new text node
local new_textnode = gui.new_text_node(new_position, "Hello!")
gui.set_font(new_textnode, "sourcesans")
gui.set_color(new_textnode, vmath.vector4(0.69, 0.6, 0.8, 1.0))

もう1つの方法は、gui.clone() 関数で既存のノードを複製するか、gui.clone_tree() 関数でノードツリーを複製する方法です。
-- clone the healthbar
local healthbar_node = gui.get_node("healthbar")
local healthbar_node_2 = gui.clone(healthbar_node)

-- clone button node-tree
local button = gui.get_node("my_button")
local new_button_nodes = gui.clone_tree(button)

-- get the new tree root
local new_root = new_button_nodes["my_button"]

-- move the root (and children) 300 to the right
local root_position = gui.get_position(new_root)
root_position.x = root_position.x + 300
gui.set_position(new_root, root_position)
動的なノードの Id
動的に作成されたノードには識別子が割り当てられません。これは仕様です。ノードにアクセスするには、gui.new_[type]_node()、gui.clone()、gui.clone_tree() が返す参照だけで十分なので、その参照を保持しておくことをお勧めします。
-- Add a text node
local new_textnode = gui.new_text_node(vmath.vector3(100, 100, 0), "Hello!")
-- "new_textnode" contains the reference to the node.
-- The node has no id, and that is fine. There's no reason why we want
-- to do gui.get_node() when we already have the reference.